In this second part of the Logic Pro chorus tips tutorial Mark Cousins investigates how use of chorus and flange plug-ins can add warmth and stereophonic width to a range of different sounds.
Flange Fun
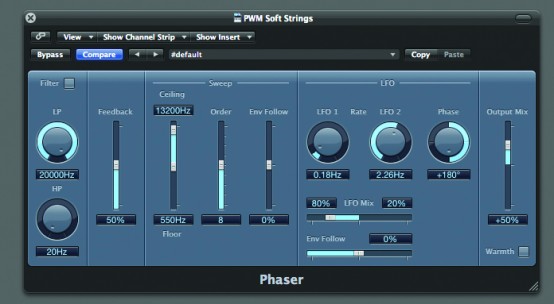
Electronically speaking, flange is a similar effect to chorus, albeit with a markedly different sound. Remove the Scanner Vibrato plug-in we were using in part one of this tutorial, and switch to the Flanger plug-in to hear its unique sound. Notice the number of parameters shared with the Chorus plug-in – Speed, Intensity and Mix – plus one important additional control: Feedback. In effect, flange is produced in the same way as chorus, except the delay times are shorter and the output is subsequently fed back into the input. Try raising Feedback and notice how the effect takes on a distinctive ‘ringing’ quality.

On the whole, flange parameters tend to be set up in one of two ways. The first is a Flanger sweep with a pronounced amount of Feedback. Try increasing Feedback to around 80%, therefore, and set Speed and Intensity low (0.166Hz and 4.5% respectively). The effect is a long, sweeping flange, with the sweeps lasting almost a full bar or more in duration. Another approach, which is more akin to chorus, is to lower the Feedback to around 21% and increase both the Speed and Intensity (1.533Hz and 10% respectively). This faster flange is much more appropriate as a warming effect, arguably making it a much more useful treatment for general mixing activities.
New Phase
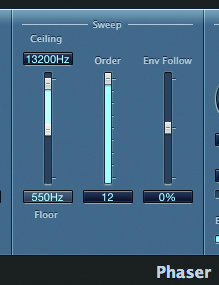
If you like the sweeping effect of flange it’s worth taking a closer look at the Phaser plug-in. Rather than modulating delay time, a phaser manipulates the relative phase between two signals, creating a pronounced comb-filtering effect that notches out large parts of the frequency spectrum. Working from the default setting, therefore, try experimenting first with the Order setting, which effectively sets the strength of the comb-filtering effect. Contrast the 4 and 12 Order settings to hear the difference, and also notice how the odd-numbered settings tend to produce a far more subtle phasing.
One of the key qualities of the Phaser plug-in is in the movement of the LFO, which creates the distinctive sweeping through the frequency spectrum. What’s interesting here is that you have two LFOs to play with, and they can be combined to create some interesting hybrid movements.
To understand what’s going on, try moving the LFO Mix control to either side of its centre position. Set in this way you can audition the two speeds of the LFOs. Try setting one LFO to a slow speed and the other to a faster speed, then repositioning the Mix control to create a combination of the two movements.
Next Dimension
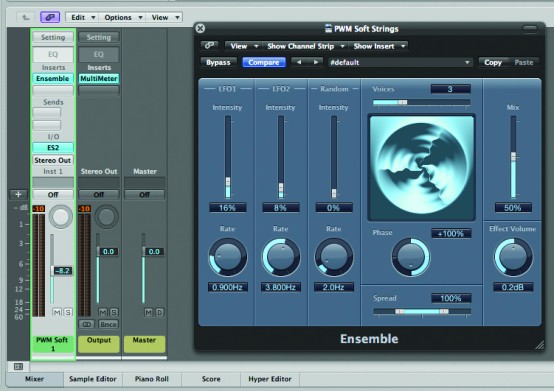
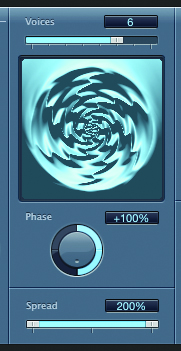
If it’s super-size warmth you’re after, the Ensemble effect is chorus on steroids – much like the extremely lush sounds you can achieve with Roland’s Dimension D. The key to the warmth that the Ensemble plug-in creates is the number of voices used to generate the effect, from a single voice for chorus-like treatments to a full eight voices for swirling, dense chorus effects.
Working from the initialised setting, therefore, increase the Phase to +100% (this gives the effect more depth), the Mix to around 50% and move between the different voice settings. Sometimes a few voices can be just as effective as the full eight, so find the setting that suits your tastes.
The complexity and interest of the Ensemble effect is defined by the two LFOs and the Random modulator. In setting the LFOs, take the approach that we discovered with the Chorus plug-in – either pairing lots of Intensity with low Rates, or a low Intensity with a medium to fast Rate. The beauty here, though, is that we can have both extremes, arguably creating a super-thick chorus treatment. As you would expect, the Random section introduces a degree of uncertainty, which in small amounts makes the effect sound slightly less artificial and much closer to the natural ‘beating’ of two instruments that are slightly out-of-tune with one another.
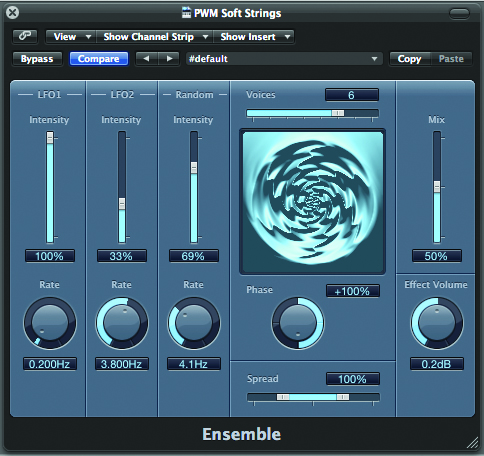
If you want to add a real sense of dimension to your sound, take a closer look at the Ensemble plug-in’s Spread control. The Spread control determines how the various voices are distributed across the stereo soundstage. At the centre position the output is completely monaural, while at the 100% setting the distribution spans the full width of the soundstage. Interestingly, the Spread can actually go as far as 200%, at which some of the voices are positioned beyond the usual boundaries of the stereo soundstage. Beyond 100%, though, there is a risk of losing mono compatibility, but this might be a price worth paying if a super-wide effect is what you’re after.
Super Stereo
Moving beyond the examples of processing a synth pad sound, it’s worth exploring the application of plug-ins such as Chorus, Flange and Ensemble on a number of different sounds, especially those that lack stereo information. When used in moderation, all of these techniques can be an interesting way of adding stereo dimensionality to any monaural sound source – including lead vocals and acoustic guitars – especially when the mix level is kept at a relatively conservative level so that the effect doesn’t become too discernible. More than just adding warmth, therefore, chorus and its associated effects can be powerful tools for a range of mixing applications.
Original post source here