Cubase Groove Quantize Part 2 – Extract Groove From Audio : In the last tutorial, I explored how to use Groove Quantize to extract the subtle rhythmic and dynamics variations that make up the ‘groove’ of one MIDI part, and apply them to another. Although the mechanics are slightly different, similar techniques can be used with audio parts, and that’s our subject here.
Prepare To Groove
To prepare the audio for groove quantising, I’ll use a similar example to last month — taking a groove from a short (stereo) drum recording and applying that to other parts, such as bass and rhythm guitar. Imagine that the bass and guitar were originally recorded to a different drum performance but, in order to spice things up a little, the drum part has been replaced with a new recording which has a slightly different feel (more funky) than the original. So the task is to keep the bass and guitar parts, but give them a little more of the groove from our new drum performance.
First, double-click on the drum audio event to open it in the Sample Editor. You can now adjust the Threshold setting under the Hitpoint tab, to identify the key drum-hit thresholds. When working with drums, I tend to use a relatively low Threshold setting to capture even the quieter hits (in this case, from the hi-hat), but if Cubase has identified some additional spurious hits, you can manually disable individual hit-points: with the Edit Hit-points button engaged, hold down the Shift key and click on them (and move them if you don’t think the algorithm has got the positioning spot-on). Don’t forget the Remove All button if you decide to start from scratch.
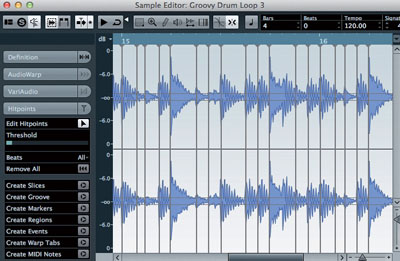
Part of the drum loop showing in the Sample Editor. Note the low threshold setting to ensure that all of the drum hits — loud and quiet — have a hit-point associated with them.
Extraction
Having generated and sorted your hit-points, you can make a groove preset from them directly from the Sample Editor window, via the Edit menu, or by dragging and dropping to the Quantize Panel, and it’s worth noting that these three different methods don’t always seem to produce consistent results (nope, I’ve no idea why either!). Personally, I tend to stick with the second approach, but see which works best for you.
With the drum part selected in the Project window, select the the Edit/Advanced Quantize/Create Groove Quantize Preset menu option. This uses the full length of the audio event to create the groove preset. Once done, make sure you save the preset (the name has an asterisk at the start of it when it has not been saved) and give it a meaningful name.
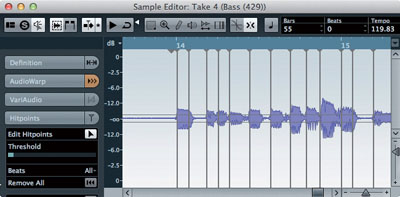
Adding hit-points to the bass part. As well as the notes starts, this also created two hit-points at the ends of notes (just after the start of bar 14 and bar 15) that I disabled prior to quantizing.
Groovy Application
To apply your groove to another audio performance, two different approaches may be used: AudioWarp and slicing.
For non-drum-based material, such as bass and rhythm-guitar parts, the AudioWarp approach can produce pretty decent results. First, create hit-points for the audio that’s to be quantised. When we later quantise the part, AudioWarp will time-stretch/compress the parts being quantised, so that the hit-points align more closely with those in the groove preset.
As with any time-stretching process, though, if you ask too much of AudioWarp you can end up with all sorts of unpleasant audio artifacts. This is one reason why I suggested starting with a low hit-point detection threshold when creating your groove preset: because there are a lot of hit-points, it’s less likely that the quantise process will have to stretch or compress any individual bit of your target audio too far.
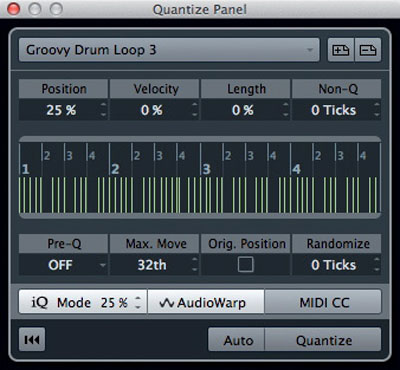
For the bass and rhythm-guitar parts used in this example, the Quantize Panel’s AudioWarp option produced the smoothest results, but quantising based on sliced audio is also possible.
For the target audio, I prefer to create the required hit-points via the Sample Editor, as it lets me fine-tune the process. A hit-point at the start of each note or chord is a good starting point, and this can easily be checked by auditioning individual slices within the Sample Editor. As shown in my bass-guitar example, the hit-point-detection process will sometimes be fooled by things like finger or fret noise at the end of notes and chords, and I tend to find that I get smoother results if I disable these hit-points in the Sample Editor prior to applying any quantisation. Cubase can add hit-points automatically for you when you select the audio event in the Project window and then open the Quantize Panel — but you don’t get the same level of control if you use that method.
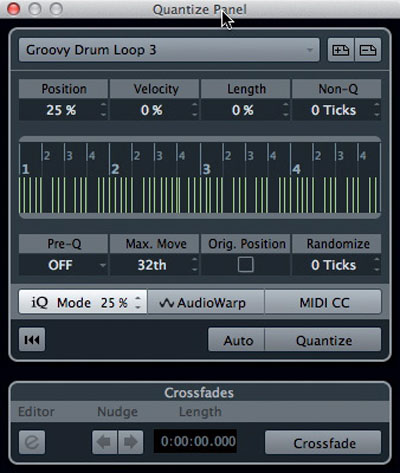
Once you’ve created and fine-tuned the hit-points, open Cubase’s Quantize Panel, select the groove preset and engage the AudioWarp button. For more gradual control over the quantise process, the iQ (iterative quantise) mode is useful: as the name suggests, this allows you to get closer to the groove by degrees, rather than snapping wholly to the groove, and this means that you can make the timing progressively tighter.
As shown in the screenshot, for both the bass and guitar parts used here a setting of 25 percent for the iQ and Position controls provided a good starting point, as it allowed me to repeatedly press the Quantize button and listen as the audio was gradually quantised a little more firmly with each iteration. In addition, a Max Move setting of 16th or 32nd intervals stopped the quantise process from moving any hit-point too far from its original position, ensuring a smoother end result.
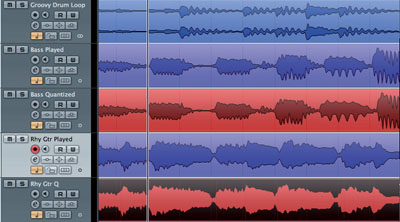
A short section of the bass and rhythm guitar tracks with both the un-quantised (blue) and quantised (red) versions shown. As an example, see how the note or chord at the cursor position has been pulled forward in time in the quantised versions and now coincides with the drum hit at the same time position.
Nice Slice Baby
Slicing is probably best used with audio tracks containing very sharp transients, such as drums or percussion, although there’s nothing to stop you trying it with simple bass or rhythm guitar examples such as those we’re trying to ‘groove’ here. When dealing with a single-track recording (rather than the mult-itrack drum recordings considered in SOS March 2012), the process is slightly different, as the slicing is done in the Sample Editor. Essentially, you create hit-points as described above, and then press the Create Slices button to slice the audio at each hit-point.
Once you’ve created your slices, the audio event is turned into an audio part in the Project window, containing separate events for each slice. You can now use the same combination of Position, iQ Mode and Max Move in the Quantize Panel as given in the earlier example (but leave AudioWarp switched off). The quantisation is then achieved by simply moving the start positions of each slice within the part to more closely match the hit-points in the groove.
As with any slicing process, moving slices relative to one another can create gaps and overlaps between slices, so you might also need to tweak the settings in the Crossfade section of the Quantize panel that appears when dealing with sliced audio. Applying a little Nudge to the left can also help, as it moves the position of any crossfade prior to the attack portion of a note, so that the attack itself, which is so crucial to the sound, is not unduly influenced by the crossfade.
Mix & Match
You can, of course, mix and match groove quantising between MIDI and audio parts, so if you’ve captured a good groove from a MIDI part, it’s perfectly possible to experiment with applying it to an audio performance (and vice versa). As with the MIDI groove quantise tasks described last month, the best way to get used to these tools is to start with something simple like a short two-, four- or eight-bar phrase for your drum, bass and rhythm-guitar tracks. If you can get those to lock together well they can be looped to build a song section, and the process can be repeated for other song sections, as required.
Finally, I’ll leave you with a handy tip: groove quantising can also be used to create convincing double-tracked guitar parts from a single guitar take. For example, if you take the kind of rhythm-guitar loop that I’ve used here, you can duplicate the track and then apply slightly different amounts of groove quantisation to each version, so that their timing is tight without being perfectly matched. Pan them hard left and right and you have instant double-tracked guitars.
If you happen to have recorded a DI’ed version of the guitar performance, you could enhance this effect by inserting a guitar-amp simulation plug-in on each track and dialing in different guitar tones. And, as luck would have it, that’s just the kind of thing we will look at in more detail in next month’s column on the VST Amp Rack.
