Building a sequenced song in your arrangement is one thing, but now it’s time to step in to the mix engineer’s shoes and tackle some creative, technical and important aspects of Logic’s Mix window.
Mix Window Groups
The first thing we’ll look at here in the Mix window is the option to group certain tracks together with others. The question then becomes, “why would I want the option to do so?” On bigger projects you might find it useful to group all your drum tracks together, or maybe vocals, midrange instruments and so forth. Once tracks are grouped, you can then adjust multiple parameters across all tracks uniformly. Let’s try it!
Above the “off” button you’ll find a blank insert-looking box, this is where we can assign groups. If we highlight (click, hold and drag around any amount of channel strips) a selection of tracks, we can then assign them all to Group 1.

Our selected tracks now contain a yellow “1” in their respective group boxes. Choose any one of the tracks in this new group and manipulate the pan, volume fader, mute or solo and watch the rest follow!
Notice that the change made is relative to the parameters original value! Highly useful as you might have mixed your drum tracks to sound great against each other, but find them low in the mix as you bring in other instruments. Grouping will allow you to preserve that drum mix without having to create an aux channel or manually adjusting all those faders.
Check out the Group Settings to dive even further into what can be adjusted in your groups.

NOTE: You do not need to create groups to make certain changes across multiple channel strips. Simply highlighting and adjusting one parameter will affect all selected tracks (even adding in insert plugins). You’d want to make groups if you want to revisit these adjustments without the burden of having to re-select them all again.
BONUS NOTE: Ever want to reset a parameter in Logic back to its default position? Try panning for example, you’ll find it a fight with your mouse to get that knob exactly back to center. Try holding the Option key while you click on the pan-pot! Snaps right back to default center. This works on a lot of different things in Logic, including plug in UIs (and even some third party plugins). Notice however, with a group turned on, this action will not reset the rest of the grouped channel strips, so turn group off if you need to reset to default.
Sends, Aux, and Busses
A big thing that new producers miss out on when they are mixing is aux tracks. These can be a bit confusing, especially when there are three different names to describe the process.
Sends is what we see on the channel strip of every tack (minus the output and master strips). Think of these as the front end to an aux track. This is where we get to adjust the amount of volume (dB) we are “sending” off to the aux track. How that amount of our channels signal gets to the aux is called a bus. Think of it like this: if I’m at the bus stop (Sends), and I get on the bus (Bus), I’ll end up arriving at my destination (Aux) right? Got it? cool!

Let’s add a wide EQed delay to a track using our aux tracks. Click on one of the two empty boxes in your Sends area and set it to Bus 1. Looking over at the far right, next to our output you’ll see Logic has automatically created an aux channel strip for you with Bus 1 added as it’s input. We've gone into the inserts here and added the Tape Delay with the 16th note dotted preset, followed by a Channel EQ with adjustments to remove certain frequencies we don’t want delayed, and lastly a Stereo Spread manipulating the high end.

Returning to the track we added the send to, we can now dial the knob up, sending out a dB amount of the channel to this new delay. This style of FX mixing allows for you to create space in a mix, as well as the perception of depth-of-field within your track. Highly useful for really pro sounding mixes! Experiment with different aux effects tracks, however make sure you include an EQ somewhere in the signal path so you can remove frequencies that might muddy or compete with other sounds in your mix. Remember that mixing is fitting the “puzzle” of your song together, and be careful of stacking frequencies by creating competing aux FX channels.
NOTE: Created a wicked cool aux FX track, but finding it unsuitable for the song your working on? Save it as a channel strip! Use the Setting box above the EQ to select Save Channel Strip Setting As. This is a great way to easily recall your favorite FX processing on any project you’ve made. If you have found you’ve made too many, visit the Channel Strip Settings folder found in HOME > LIBRARY > APPLICATION SUPPORT > LOGIC > BUS and build as many sub folders as you need inside it to help organize your effects!
What Else Are Aux & Busses Good For?
If you’ve used multi-output instruments in Logic, you might have seen these aux tracks in action before. Knowing this, try to think of them as no different than the aux tracks found on traditional mixers. Most hardware users will use them for routing different outputs of their sound card (i.e. Output 3-4, 5-6, etc) to external hardware that feeds back to Logic on another input on the sound card.
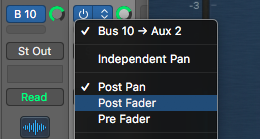
Busses can also be used to create a “glue” that can hold your drum tracks together better. Try selecting Bus 10 as your output on separate kick and snare tracks, then visit the new aux channel built for it, and add your favorite compressor to it. You can do this with vocals as well if you want to apply EQ or compression to all the vocal comps easily. A very classic approach to mixing.

BONUS TIP: Sends by default act as “Post Pan” sends. You can change this to "Post Fader" or "Pre Fader". "Post Fader" means that if you drop the fader of a channel to a quiet volume setting, your send amount will always use that fader setting as a starting point. This is great if that channel never changes in volume (via automation). What if the channel fades out over 16 bars, but you want a reverbed “ghost” of that sound to remain in the mix? We’ll you’ll soon find out at this “post fader” setting the send will disappear with that channel too. To solve this, simply change the send behavior to Pre Fader.
Now that aux track will not be effected by the channel’s volume and provide you with even more interesting ways to add layers of FX across your mix!
NOTE: A word of advice I must pass along, as it’s one of the most important things to remember when mixing. Adding any sort of FX is best when it doesn’t distract from the musicality of your song (that is unless you are going for some seriously over produced style of music). When you create these aux tracks, start with the send knob dialed ALL the way up. Make sure you KNOW how this FX sounds. Then, dial the send way back until it’s just noticeable in the mix. A good reverb, delay, etc. should only be noticeable when you take it away. Try it by muting the send (holding option while clicking the blue “Send” box) and listening to see if you notice the change.
Revealing Secrets
I’ve cultivated a number of little mixing tricks over my years of using Logic, and I’ll reveal a few of them here today so that you can not only solve some hair-pulling problems in mixing, but also add a bit of spice and warmth to your mixes!
Utility > Gain

Occasionally you might run into phase issues (for more on phase and what it means, this lovely article by Universal Audio is a must read). This little unsung hero of a plugin will stop you from having to overthink it. Use it to quickly make a stereo sound mono, flip the polarity, or even adjust the balance when panning is not enough.
Imaging > Direction Mixer

Sometimes you’ll find a sound or sample is too stereoized, causing you some correlation issues (where the left or right speaker is favored too heavily from the other), or you’d rather the sound be more centered without making it mono and losing all the stereo spread. This is where you might employ the Direction Mixer. If you are doing a classic stereo mic recording set up, the MS decoder is quite handy as well!
Modulation > Ring Shifter

This guy doesn’t get the love it deserves. Most write it off as a odd “Theremin” sounding effect, but it can also be a great way to “move” a sound just enough to give it some body within a mix. In the screen shot above, the Ring Shifter is on an aux track (NOT as an insert) adding just a bit of flutter and can be substituted for a more subtle chorus effect!
Try this idea with distortion. Logic's Bit Crusher, on a high resolution setting, is a great way to add a punch up of gain on any sound or instrument, again use the bare minimum here – unless you really want a noticeable effect.
Metering > Multimeter

We could talk for HOURS about studio acoustics, proper speaker setups, near field vs far field monitoring, etc. These days producers have to get by with what they have and don’t have the luxury of a perfect mixing room. In these circumstances the best thing you can do is learn to read a frequency analyzer. Logic comes with a pretty decent one called the Multimeter. It should really be the only thing on your master output, and adding it here will give you an over all perspective of how your song actually “looks” frequency wise. You can spot mixes with too much bass, or ear piercing highs, even if your studio monitors can’t reproduce those frequencies! Highly recommended for all to use!
Automating the Invisible
How do you automate a channel strip that’s not all ready in the arrange window? Most of the time, it’s the idea of creating a fade out for the master output, or maybe an aux track you want to have pan by drawing in automation nodes with your mouse. Simply find an empty spot on the channel strip you want to add to the arrange window, and right-click (or control click), selecting Create Arrange Track (or use Control + T).
Now have at it! Happy mixing!
Post from The Cell Studio