Here’s a chord progression chart you to help you with your chord progressions. We’ve already covered much of the basics of how to create major and minor chords, understanding the basics of scales and key, and how to make use of these when working with sample loops and one shots. If you haven’t already read these, I recommend you start reading about those here in our music theory section to get a basic groundwork laid.
I’m no music theory magician, so I’ve tried to simplify things and give you the fundamentals, along with a couple great tools for those of you who aren’t musically trained.
OK so moving on from there – we now know how to create some nice chords that work with our sampled loops. Let’s say we’ve found a chord that we really like and we want to develop it from there, moving around a few complimentary chords before returning periodically to our original chord. This is what’s known as a “chord progression”.
Most modern music actually uses a selection of very familiar chord progressions, and there are some that just sound better to the ear. Experimentation is a good way to go here, but there are some general rules you can follow when trying to find good chord progressions.
First off, we need to understand a little about the notation. Chords use a Roman numeral system, wherein lower case refers to minor chords and upper case refers to major chords. So it’s like this:
Major chord: I, II, III, etc.
Minor chord: i, ii, iii, etc.
Augmented chord: I+, II+, III+, etc.
Diminished chord: vi°, vii°, etc.
Half-diminished chord: viiØ7, etc.
Extended chords: ii7, V9, V13, etc.
Altered tones or chords: #iv, ii#7
For now let’s just focus on the Major and Minor ones I’ve highlighted. For the purposes of this tutorial, the main thing to note is that upper case letters refer to Major chords and lower case ones refer to Minor chords. The numbers represent the “Diatonic names” listed in the chart below. So, for example “III” represents a Major 3rd, because the number is 3 and the numerals are upper case. Likewise a “iv” represents a Minor 4th, because the number is 4 and the numerals are lower case.
OK, so now we are just about ready to be able to use a great chart to help us experiment with chord progressions from our starting chord of choice. But one more thing. How do we know what the Major chord I, II, III, etc. and Minor chord i, ii, iii, etc are for our starting chord? You simply figure this out by taking your root note (the first note of your chord) and counting semitones. Here’s a handy chart.
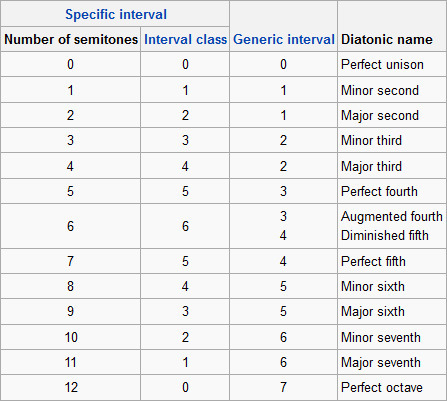
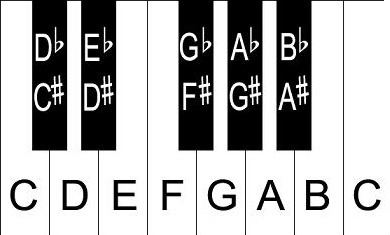
OK, so let’s say we started out with an AMajor chord (A is the root note), and we wanted to find out the minor 6th of this. Based on the intervals chart, we’d start from A on the keyboard and count up 8 semitones. You’ll arrive at F. So, Fminor is the minor 6th of A. (Forgot where your A, B, C is etc? Here’s a refresher.)
Great. We can now start to use some standard charts to help us figure out chord progressions.
Let’s work out a Major chord progression using the chart below. You’ll remember, we started out with an AMaj. Since this is our first chord, it is represented in the chart by “I”. (BIG “I” because it’s a Major chord) Next, we can choose any chord.
Let’s go to vi (you’ve learned to read this as a 6th because the Roman numeral is 6 and because it's lower case we want a minor.) You'll remember from our example above that the minor 6th of our root note A is Fminor.
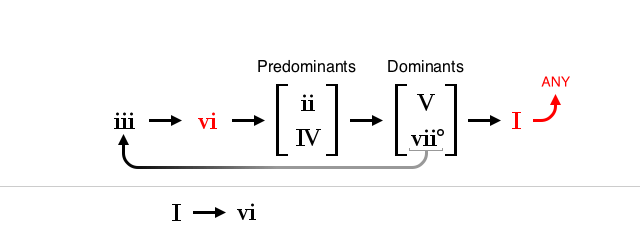
Now, looking at the chart our next options from the minor6 are ii or IV.
Let’s go with IV. We can see from our intervals chart that a perfect 4th is five semitones from the root note. So, counting 5 semitones from our root note of A, we see that we land on a D. Since the “IV” is large, we know we’re doing a Major chord. So it’s a DMaj.
Now, we can choose either V or viio. Let’s go with V. We’d use the same method to find this. Using the chart tells us to count up 7 semitones from A, and we arrive at E. The “IV” is large, so we’re doing a major chord. EMajor then.

Finally, V takes us back to I.
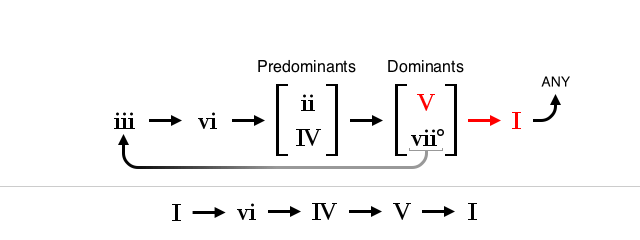
Our finished chord progression is: I→vi→IV→V→I.
OK, great so we can experiment with the various options we have for a major chord progression and find one we like. What about if we are starting with a minor chord?
The chord progression chart for minor scales is very similar to the major scale chart.
A minor progression chart looks like this:
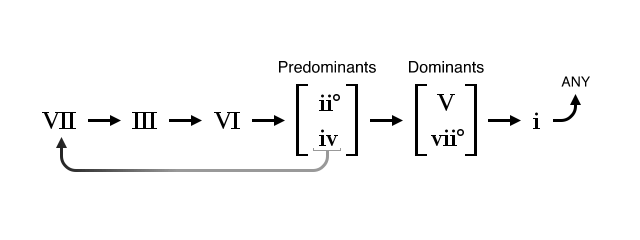
So, if we started off with an AMin and decided to go to “III” we want the Major 3rd of our root note. We see that a Major 3rd is 4 semitones from our root note of A. That gets us to C#. Since the “III” is large, we’re doing a Major chord. OK, so that’s a C#Maj. And so on.
Have a play around with this by getting yourself a starting chord, using the intervals chart to figure out the iii, II etc, and then using the progressions chart to find the next progression. Over time, you’ll start to get used to some patterns that you will find you like the most…and not surprisingly are common to many songs you’ll already know.
By the way, in case you aren’t sure how to actually make the next chord in your progression once you’ve used the interval chart to find out what it is, you can use this to show you where to put your fingers for each chord.
Finally, you don’t HAVE to follow these charts – music allows for deviation from rules. But, this is a great way for you to find progressions that will work and start to give you an understanding of chord progressions that can lead to your own experimentation.