Parallel processing is a mixing technique where you duplicate an audio track, add processing (such as compression) to the duplicated audio track, leaving the original signal non-processed (dry), mix them together and send them to the master out.
This technique is particulary useful with drum compression, as with it you can apply heavy compression to the duplicated drums while retaining the original dynamics of the non-processed version. Both signals – compressed and non-compressed – are then sent to the master out. This is a great trick to make your drums sound huge.
This tutorial will show you how to set up parallel compression (also known as New York compression) in FL Studio.
Let’s begin.
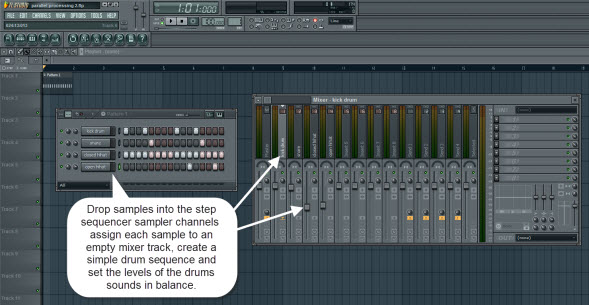
Pick a set of drum samples – kick drum, snare, closed hihat and open hihat – and drop them to the step sequencer sampler channels and assign each drum sample to an empty mixer track. Create a simple drum sequence and use the mixer to set the volume levels between the drums in balance:
Creating The Drum Sequence
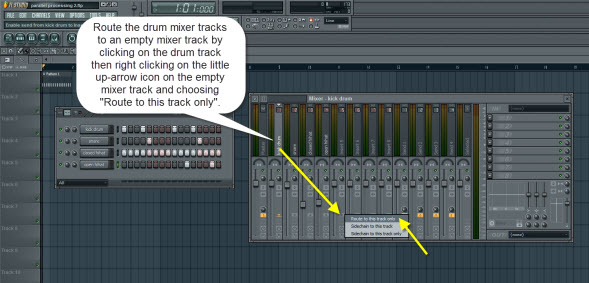
Now, in the mixer view, ROUTE all the drum mixer tracks to an empty mixer track. Into this track we will add the compression. You do the routing one-track-at-a-time by clicking a drum mixer track and then right click that little up-arrow on a empty mixer track and choose “Route to this track only”. The little up-arrow on that empty mixer track turns yellow. Do that for each of the drum mixer tracks.
What we are doing here is sending the signal of each drum mixer track to a master track THROUGH one (or more) mixer track(s). As we chose ‘Route to this track only’, the signal will not be sent straight to the master track – ONLY through the chosen mixer track. This allows us to apply processing (such as compression) to the drums as a GROUP so that it affects all the drum sounds together. However, we can still control the volume levels, apply processing, eq, etc. to each individual drum mixer track.
Routing The Drum Mixer Tracks To An Empty Mixer Track
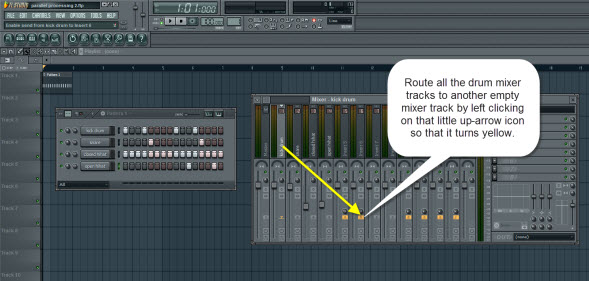
Ok. We are going to need another empty mixer track where we route the drums (you can route a signal to as many mixer tracks as you want) - and this mixer track we use to send the non-processed (dry) signal to master track. So pick another empty mixer track, click on a drum mixer track and this time, LEFT click on that little up-arrow icon on that empty mixer track so that it turns yellow. Do that for each drum mixer tracks. Note that you should use the left click as we are routing the SAME SIGNAL to two separate mixer tracks. The same method applies if you want to route it to even more additional mixer tracks, because if you go and right click and choose ‘Route to this track only’, the signal will be routed to ONLY to the chosen mixer track. Think of a situation where you have already routed signal to a lot of different mixer tracks, and you choose ‘Route to this track only’, you will loose all the other routings and you would have to set them up again.
Routing The Drum Mixer Tracks To Another Empty Mixer Track
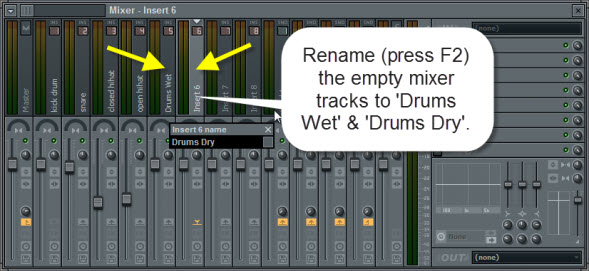
Ok. So now we have routed the drum tracks to two separate mixer tracks. Rename them ‘Drums Wet’ ‘Drums Dry’. Into the ‘Drums Wet’ track we are going to add the compression and ‘Drums Dry’ track we leave dry.
Rename Empty Mixer Tracks
But we are not done yet with the routing. We are going to need one more empty mixer track – let’s rename it to ‘Semi Master’. We are going to send the signals from ‘Drums Wet’ and ‘Drums Dry’ mixer tracks to the master out through this empty mixer track. This way we can control the volume levels and apply processing such as eq which will affect the whole group of drum signals via one mixer track. This will simplify the task to mix the drums with other instruments as we don’t have to adjust the settings track-by-track.
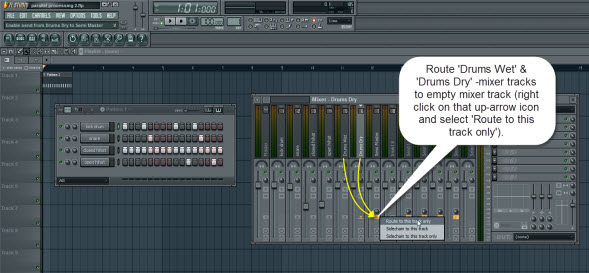
So, route the ‘Drums Wet’ ‘Drums Dry’ mixer tracks to a empty mixer track (this time using right click choosing ‘Route to this track only’).
Routing The "Drums Wet" And "Drums Dry" Mixer Tracks To Empty Mixer Track
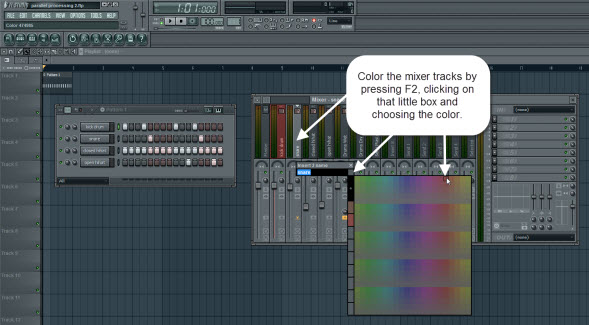
It might be a good idea to color the mixer tracks just to keep things organized as with all this routing, etc. you may start to get confused which track is sending what to where - especially when you start to add more stuff to the mixer tracks. So simply just click on a mixer track, press F2 and click on that little square box (on the right side in that rename box) and choose the color.
Color The Mixer Tracks
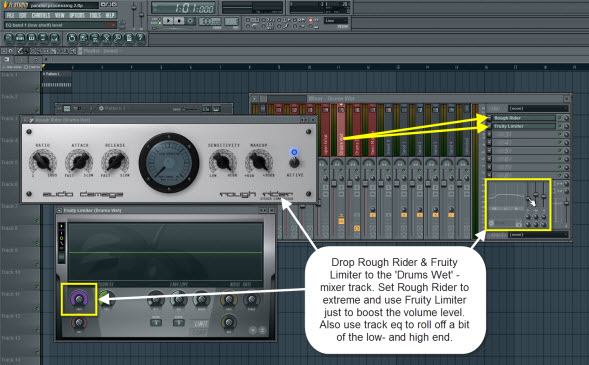
After installing the Rough Rider, drop it to ‘Drums Wet’ mixer tracks fx slot and go extreme. The following settings work well with the type of drums used in this tutorial: Ratio 1000:1, Attack 1.0, Release 1.0, Sensitivity -60dB, Makeup 30dB.
You might also add a Fruity Limiter to the ‘Drums Wet’ mixer track just to increase the volume level - as the above mentioned Rough Rider settings brings the volume levels down.
Add A Compressor To The Drums Wet Mixer Track
Now here’s something very important so pay attention: plugin processing delay. When we add a plugin to a mixer track, it will cause a minor delay that puts the audio on its mixer track out of sync with other mixer tracks. So if we have two identical audio signals on two separate mixer tracks (like in this tutorial example) and we drop a plugin to either one of the tracks, plugin processing delay will cause an unwanted effect called phasing. We don’t wan’t that to happen here as it makes the drums sound bad.
There IS an automatic plugin delay compensation (PDC) feature in FL Studio, but it doesn't always work in a routing situation like this.
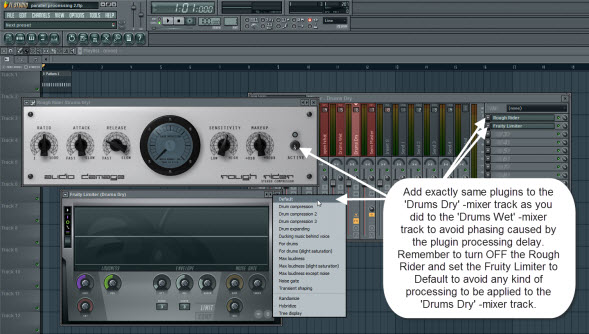
So, in order to cope with this problem, drop exactly same set of plugins to both the ‘Drums Wet’ and ‘Drums Dry’ mixer tracks. In this case, Rough Rider Fruity Limiter. But in the ‘Drums Dry’ mixer track, open the Rough Rider, and turn it OFF and set the Fruity Limiter to default settings - as we dont wan’t anykind of signal processing to happen in the ‘Drums Dry’ mixer track.
Avoid Phasing By Adding Same Plugins To Both Mixer Tracks
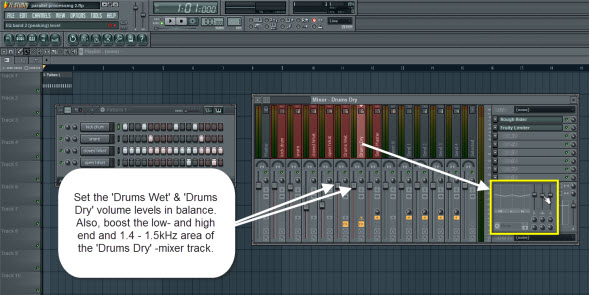
Ok. Now find a balance between the ‘Drums Wet’ ‘Drums Dry’ mixer tracks. In this tutorial example, setting both to 0.0dB works actually quite well. In this case there is a boost to the low- and high end and bit of the 1.4-1.5kHz area of the ‘Drums Dry’ mixer track using the track eq.
Set The Drums Wet And Drums Dry Mixer Track Levels In Balance
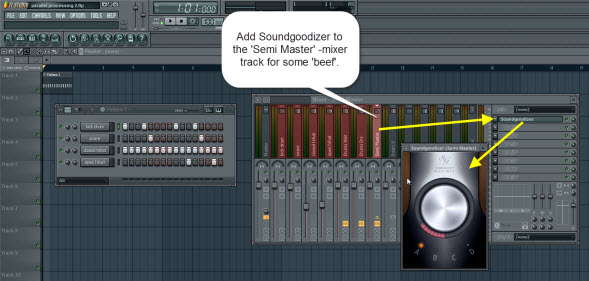
We've also ‘beefed’ up the drums a bit by adding a Soundgoodizer to the ‘Semi Master’ -track.
Add Soundgoodizer To The Semi Master Mixer Track
Now, create a few more drum patterns with a bit of variation to the groove and listen the end results:
So what we did here is use routing to send a drum signal to separate mixer tracks, added a heavy compression to one while leaving the other dry, mixed them together and sent them to a master track through a third different mixer track with Soundgoodizer.
Sounds complicated, but once you get used to it, it’s a piece of cake.

