More and more relative beginners are taking on their own mastering. This is great but if you plan to get the job done yourself there’s a few key things you should know before starting your first mastering sessions.
One of the key things to look out for is the final level of your finished master and the amount of reduction to your music’s dynamic range. In most cases you will only need to look to your final limiter to address both of these issues. Let’s take a look.
Watch That Dynamic Range
One of the most important things to keep your eye on during any mastering session is the amount of dynamic range reduction taking place. This is usually directly linked to any dynamics processors you maybe using in your chain, so look at your compressors and limiters.
Dynamic range reduction occurs when you apply gain reduction to your signal and will increase perceived volume and give you a more uniform level throughout your project. In moderate amounts this can work well but push things too far and you’ll squash the life out of your music and lose any dynamics the original mix may of had.
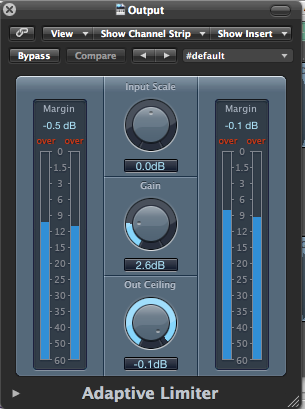
The main way to attack the issue is to watch the amount of gain reduction taking place in any dynamics processors you are using, especially the final limiter. 2-4 dB of reduction should be more than enough in most situations, any more and you risk a noisy, distorted master that isn’t kind on the ears.
So check your gain reduction amounts and look for some movement in your master output level, this is a great way to get a general idea of how much dynamic range remains in your audio. Of course if you want a truly accurate reading you should use a dedicated syndic range meter. You can actually download a free one here.
Check for Clipping
With your dynamics in check you can move on and concentrate on clipping and overs. Go through every plug-in in your chain and ensure that they are all operating within acceptable levels. Clipping in even one of your plug-ins can introduce artifacts and saturation you may not want.
One of the main things to check here is the output ceiling of your master limiter. The obvious choice is 0db but many mastering engineers will actually use a value just below this. -0.01 dB is arguably the highest you should go, as this will allow a small amount of headroom for older playback devices and therefore create no clipping in any device used.
Of course the opinion on this differs and you need to make up your own mind but you should certainly not let your level rise above 0 dB. Stick to this and you should be pretty safe.
Final Checks
Now it may sound obvious but be sure to run final checks on all the points mentioned. Spend some time playing back the whole track and check loud and quiet parts of the project. Listen for clips, dynamics and any glitches.
The likelihood is that you’ve spent a good amount of time writing, recording and mixing your project so take your time with this process and you should produce a well rounded master that your proud of.
Original source: http://audio.tutsplus.com/tutorials/mixing-mastering/quick-tip-how-to-ensure-your-masters-are-not-overlimited/


