Logic Pro X's Alchemy is a powerful synth in its own right. But, with its ability to re-generate user loaded audio samples and to spectrally synthesis images Alchemy becomes something truly unique.
It’s no wonder Apple bought Alchemy, (and the company Camel Audio along with it) then added it to Logic’s great arsenal of instruments. It uses an additive/spectral type of synthesis not seen in any of the Logic classics. All the regular virtual analog type oscillators are here in Alchemy, but the real fun begins when you load up your samples, audio clips, and loops. For even more wacky brilliance, you can load an image that Alchemy builds an audible version of using spectral synthesis.
Let’s first talk about what is actually happening in Alchemy when you load in some audio. Unlike a sampler like EXS24, the audio used is not simply a triggered sample, it’s “re-generated.” Using Additive methods, the sound is re-created using thousands of sine waves played back at different frequencies and volumes. The end result is an extremely convincing synthesized version of what you fed into it. No longer (unless you want to) will a sound play higher and faster on the higher keys. This makes working with samples extremely flexible.
If you’ve played with traditional samplers, you know that even as little as 3 semitones played up or down from a samples original position can result in an extremely unnatural sound! Alchemy has resolved this issue, allowing you to make an instrument from a single sample using various synthesis methods at its disposal. In this article I’ll show you how to feed Alchemy samples from your library to make simple but expressive playable instruments.
Step 1: Find Your Sound
First, take the time to find a single sample of audio—like a bass note, lead synth note, a clip from a song, anything really. Try playing in a bass note from your favorite synth, then covert it to audio. Don’t worry if the sample is too long, you can easily adjust the start or end points within Alchemy. I used a tight sounding bass stab snatched from a popular drum machine.

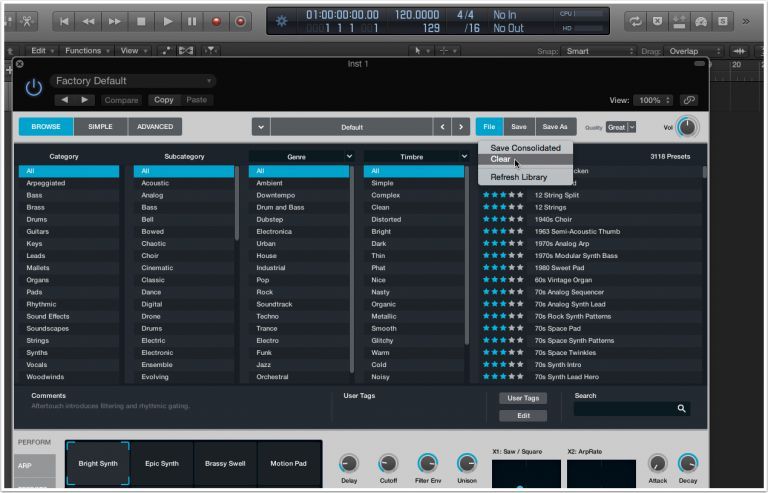
Step 2: Open Alchemy and Clear the Patch
Open the Alchemy interface, and from its local file menu, click and choose “Clear”. This will not erase the default sound. Simply opening a new instance of Alchemy will return you to it.
Step 3: Importing Samples, Stabs, Loops, etc.
Click onto the “Advanced” tab at the top left of Alchemy’s interface. This shows the global menu. Under Sources (Alchemy's oscillators) you’ll see that by default “A” is already enabled of the four total oscillators/sources. Click where it currently reads “saw” and a menu appears allowing you to choose “Import Audio.”

At the top of this window you can see the current file path in white. The Places menu here gives you fast access to your Desktop or Documents folder, or you can easily access any connected drives. Navigate to the location of the sample you’ll be using and click it. Now click the import button on the bottom right. You can also drag and drop apple loops, and samples from Logic’s All Files window onto the “Dropzone” area on the right side.

Step 4: Tune
Alchemy attempts to match the detected pitch to a specific key. If it can’t, it places the original source at C3. If it doesn’t guess correctly, and you don’t know what note was originally played, enable the B oscillator by clicking it, and it will light up bright blue. Play a single key on your MIDI controller and adjust the tune knob by ear on the imported sample till it matches. Do this by adjusting the Source A’s tune knob until it plays the same note you’re hearing from Source B that you enabled. Once you’re done adjusting, disable Source B.

Step 5: Edit Start, End and Loop Points
Even though Alchemy has re-generated your chosen sound, you still have the ability to adjust the start, end and loop on it with traditional sample editing tools. Click the A Source by pressing its button (below the word Global). This brings forward the advanced settings for each of the four sound sources. Click the Edit button located to the top left side of the real-time spectrogram window. Then onto the subsequent “Spectral” tab. On the left side parameter window that appears, select “Forward/Back" from the Loop Mode menu. Now carefully place the two flagged beams somewhere in the area you want to loop. When you’re finished, click the X in the top right corner to come out of the edit window.

Step 6: Adjust and Try Different Filters
Click back onto the “Global” button on the left top corner of Alchemy. By default the Global page’s Filter is set and on giving you a very nice and clean sounding lowpass filter. Try out some of the other filters here like the various bandpass, highpass, and specialized filters. The drive knob pumps up the volume into the filter driving it in a very precise and excellent sounding way.

Step 7: Add the B Source and Import an Image
Re-enable Source B again like you did in step 4, then click the B Source button (Below the Global button). Click the edit button again in here now, then again onto the Spectral tab like in step 5. Click the “Image” button to load up an image as a source for the Spectral synthesizer. This can be crazy amounts of fun. Brightness equals amplitude and height equals pitch. I searched the internet for Op-Art images as sources and came up with a lot of crazy results. The resolution of this process is not high so this results are somewhat jagged sounding. The experimentation here is nearly endless.

Step 8: Add Some Effects
Last but not least, let’s add some effects to either individual Sources, or as a blanket across all sources. Click the effects tab at the bottom left corner. Click the Main button here, then onto the On button of one of the effect slots below it. Click the downward arrow and you can choose from various effects including delays, distortions, and a Convolution Reverb with some very familiar IR (Impulse Response) names. A mini Space Designer built-in!

Tips:
Although the conversion process from sample to spectral oscillator in Alchemy is amazing sounding, it does seem to diminish a source sample’s attack. Try adding another Source and filling it with short sounds with high attack like hats to add punch to your sounds.
Original Source: Here