
Becoming an accomplished music producer is a long process, whether you're aspiring for the top notch studio or simply want to know how to produce good music at home. The ways to getting better at music production are diverse, but there are some common pitfalls to try and avoid. The following set of music production tips will look at 10 simple ways to improve your music production process and avoid sounding amateurish.
1. Learn About Compression Techniques
A common mistake that prevents amateurs from getting a full sound is not filling the “box” that is volume, panning, and frequency. The typical dilemma is this: as more sounds are layered together, the audio may start to clip. And so you turn the gain down on the each channel of the mixer. But then it sounds quiet. In order to fix this, you need to learn about compression and mixing. If used properly, compression reduces the variations between one audio channel’s highest and lowest gain levels throughout the track, which allows you to turn the volume up without clipping. If you want to learn more music production advice about compressors, start our series on Compression Basics.

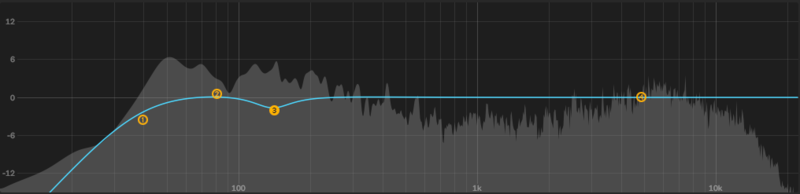
2. Reduce Muddy Sound With EQ
Removing the frequency below say 30-40Hz on your track's elements is a good idea. This frequency range essentially offers nothing to your mix other than a low end rumble which will quickly clog up your mix as you add more and more elements within this frequency range. By using an EQ to "roll off" this range on each element in your track, you'll end up with much more space and clarity.
When too many frequencies are overlapping in a mix, the result is also “muddy”. To prevent mud, you must consciously keep in mind what range of frequencies you are adding with each new part. Inevitably, frequencies will overlap, no matter what instruments you choose. For example, two bassy sounds on top of each other will interfere, resulting in weird phasing issues. So take this music production advice: if you want to use two instruments that use up the same frequency spectrum, you’ll want to carve out the highs on one and carve out the lows on the other (through the use of EQ, you will eliminate too many overlapping frequencies and clear up your mix). The end result should consist of many different parts that all cover different ranges of frequencies, all adding up to a full, clear sound.
Learning to "roll off" where necessary and "notch out" space in the mix for each element is something that takes time, and it's a good idea to learn the process with the help of a Spectrum Analyser. By adding one to each channel of your mix, you'll see where things need to be rolled off, and where that specific element is most prominent in the frequency spectrum. Then you can EQ out the other elements in that range, allowing it to breathe in the mix. By doing this for each mix element, you'll end up with a cleaner mix.
Most DAWS come with adequate spectrum analysers, but many plugin companies also make their own which often offer improved visual feedback and other features. You can check out the range of free, value and premium Spectral Analysers at Plugin Boutique.
3. Beware Of Stacking Big Phat Presets
Presets are a great place to start and some of them are ready to slot right into a track with great results. However, many VST instrument plugins have presets that are designed to sound fantastic on their own, but can create problems when thrown together with other big phat sounding presets.
This is because many of these presets fill up much of the low and high end as well as often unnaturally filling the stereo field (for example, big wide bass sounds). Unless you carefully carve out the clashing frequencies in these big phat sounds using EQ, you may get a muffled, muddy sound when throwing these types of heavily processed presets together. Alternatively, you may get an unnatural sounding stereo spread.
As a result it's also useful to learn to modify the presets by taking the time to learn how to program a synth. I find myself dividing music-making time into at least two different tasks: patch programming and sequencing. Programming can consist of long hours in front of a synth, twisting knobs (or virtual ones) and fine-tuning the sound to perfection. It may seem boring to some people, but one of the keys to succeeding in your music is to be original and find your own sound. Taking the time to create your sounds from scratch (or at least modifying presets to suit your track) can make all the difference.

4. Don't End Up Awash In Reverb
A common mistake amongst novice producers is to use too much processing and overload on the effects. While this can yield creative results when done methodically, slapping on the effects heavy-style can eventually lead to a muddled and hectic sound.
Reverb is a very commonly abused effect. If you do use reverb, a tried-and-tested music producer technique is this: With your reverb processor on a separate channel (Return/Aux), get sound reverb character as you want it, and then turn the channel right down to nothing. Next, bring the channel back up slowly until you can hear it, and then bring it slightly back down again.
The key to knowing if you’ve got this right? Your average listener would notice if you suddenly took the reverb away, but they wouldn’t notice its presence until you do. Tracks that are drenched in cheap reverb almost always sound amateurish.
Looking for a great, free reverb plugin? Here are some of our recommendations.
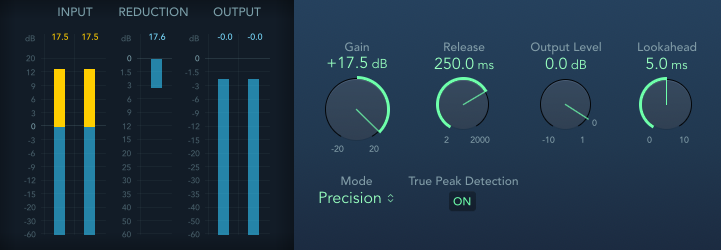
5. Be Aware Of Over-Limiting
While limiting is a valuable tool, it's often something that the novice will abuse. This has become even more of a problem with the "loudness wars", where everyone is fighting to get the loudest track out there. The result of over-limiting a track is that the bounce ends up in a file that looks like a brick wall, with no peaks and troughs and very little dynamic range. It may be loud, but to the brain it sounds unnatural. Learning to achieve a balance between loudness and dynamic range is important.
6. Learn Home Mastering Basics, but Don't Go Too Far
The opposite of over-limiting is a weak and low-volume track, another sign that the track is not properly mastered. A weak-sounding track is going to struggle to excite the listener, so it's important to get a grip on the basics of making your track relatively loud and punchy.
These days, a lot of producers are mastering their own music with software such as Wave Arts PowerSuite, iZotope Ozone, PSP Vintage Warmer, Waves MaxxVolume and so on. These plugins can really improve the overall loudness of your track and when used properly can deliver professional sounding results.
One big pitfall to watch out for here: most music making tips pieces will agree that you should avoid 'mixing into' a limiter or mastering chain. This means that you make your mixing decisions while you've got a chain of effects loaded onto your master bus. Sure, it sounds better and more professional while you're doing it, but your mixing decisions can become unreliable when you deactivate that chain in order to send your track's stems to a mastering engineer, who'll want to apply their own expert processing.
7. Tighten Up Your Timing
If you aren't the tightest at banging out beats, basslines and the like using a MIDI controller, you'll probably end up with slightly loose rhythm parts. This problem is amplified if the latency on your audio interface adds a delay from when you hit a pad or key to when the sound is generated. In this case, it's probably a good idea to turn to your friend "Quantize" and also a good idea to look into the best way to minimize and account for latency in your setup. Each DAW will have a section on this in your manual, and while it might be a little boring, getting this sorted out in your auto-load template will save you plenty of trouble down the line.
Quantization is also easy to go too far with. Only quantize everything to 100% if you're going for a mechanical, computerized drum track. In order to retain the human feel, many people only quantize to 75%-90% and you should be able to find how to set the quantize value fairly quickly in your DAW's manual.
Also, sometimes you may need to quantize certain groups of MIDI notes on their own, apart from the whole drum truck. You’ll need to do this when you have triplet notes, for example. Some quantize menus will have “1/16 + 1/16 T”, which means it will quantize to the nearest 16th note or the nearest 16th triplet note. If you have this option, you can apply quantization to the whole track.

8. Don't Get Stuck In The Loop
Loops have become an integral part of modern music, and there's no doubt that some of the most memorable tracks in the past few decades have been the result of that oh-so-addictive loop – especially thanks to our new Loopcloud software making it easy to browse and audition loops within your DAW project before you even choose to buy them.
However, the repetitive overuse of loops in your tracks can lead to a stale, uninteresting track if those loops aren't used properly. If you want to use the same sample over and over, consider looking into ways to transform it, modulate it or shape it somehow so to get some variation and keep things interesting for the listener. Slice it, dice it, pitch it, reverse it, flange it, phase it, you name it. Another creative way of getting more from your samples is to create interesting variations of the same loop with Ableton Live's follow actions.
9. Treat Your Room
One of the most common problems for bedroom producers who want to get better at music production is that their room lacks any acoustic treatment and has a bad bass response. It's something we'll all deal with to some extent if you're making music out of your home and not in a top end studio. However, there's plenty of information online about how to improve the accoustics of your room with simple and cost-effective accoustic treatment. You'd be surprised what a few carefully placed rugs, hanging blankets and so on can do to help you get the best mix out of your space.
10. Master What You Have First
We live in a world of abundance when it comes to audio production tools and software, but sometimes the choice can be paralyzing. Part of becoming a better producer is mastering your kit - and that's nearly impossible to do if you're constantly moving onto the next big thing. Learn to use your gear inside and out, and when you do you'll realize what you actually need to take it to the next level. Consider starting out with some of the great free software out there to learn processes, and then as you improve your knowledge, consider moving onto more premium versions with a strong foundation of knowledge.
This also includes styles of music. By all means, experiment and keep an open mind, but if you're making X this month because it's the next big thing, by the time you figure out your own sound there, you'll likely be compelled to move on the next trend. Be yourself!