Author: Colin C
Colin C. is a musician and audio engineer, a veteran Logic user and was a certified Logic Pro instructor for Apple Computer for over 4 years. He currently runs The Cell Studio in Los Angeles California with his work featured on such TV shows as “True Blood”, “Bones”, and “The People’s Choice Awards”. http://facebook.com/thecellstudio
Years of teaching Logic has taught me one thing, everyone develops their own ways to best use the software. It's the thing I most love about it, as with any complex tool, a person's unique creative vision can be captured with it. Saying this, I offer up to you all some of my favorite Logic Pro tips and tricks borrowed and learned over the years to add to your own workflow and tweak in your own ways.
1) Better Compression
Compression – can’t make modern music without it! Logic has always had a built in Compressor over it’s many years, and I’ve found that people either loved it or hated it. With the update in Logic 9, we got some brand new compressor types that I find most Logic users pass over. These 5 different circuit types can radically change your opinion on this compressor and have you using it more without having to run out to your 3rd party favorites.
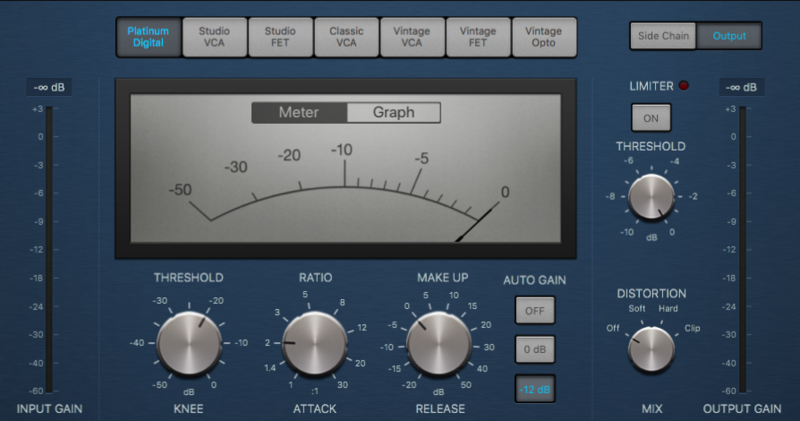
FET: this circuit is modeled after a Field Effect Transistor, the most famous one being the 1176 UREI. Use this circuit type for material with sharp attacks/transients and fast releases.
VCA: here’s your typical Voltage Controlled Amplifier circuit – think a DBX160. Throw hot signals through this circuit type, especially when you need a very fast response time. Love this one for squashing down terribly hot signals.
OPTO: one of my favorites, it’s your Optical Isolator circuit, better known as the classic LA2A. When you want material to feel “fatter” this is the circuit to go to.
CLASSA_U: another great one, this is modeled after the Variable Meu Compressor type, known as tube compression, and was actually the first ever kind of compressor created for audio. The most known of this type being the Fairchild 670, yet another great one for added colour.
CLASSA_R: this is considered the newer circuit type for the default Platinum circuit. Most have compared it’s likeness to the NEVE 34609. I personally can’t find a noticeable difference between this and Platinum.
Each one of these will need tweaking on an individual level, and the one bit of advice I can give if you are new to compression is to make sure you are lowering the threshold fader. I can’t count the times I’ve seen people throw on the compressor and not adjust the threshold to the level of the channel! Unless you see the gain reduction meter on top pulsing towards the left, the compressor isn’t doing anything, all you are hearing is the default +4dB gain it adds (which is usually to compensate for a highly squashed threshold setting).
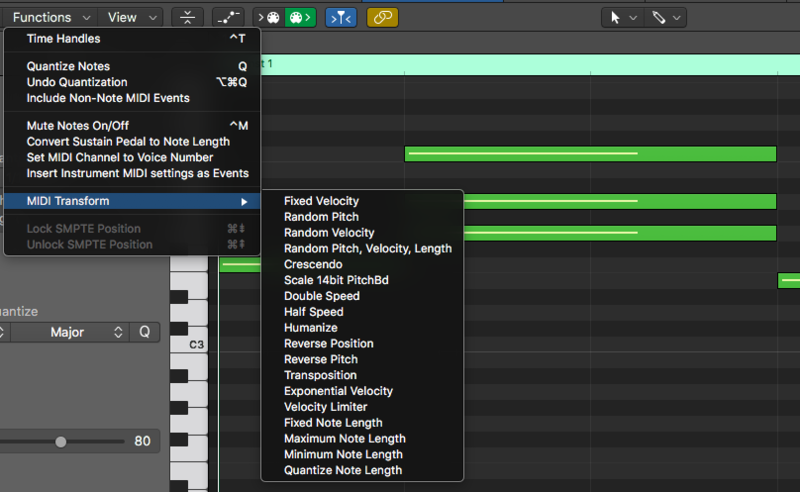
2) Transform Your MIDI
No matter how you input MIDI into your project, there will always be a time when you’ll want to tweak the performance, and I find this is when my students were getting the most frustrated at Logic. Whether it’s to add a human feel to your mouse-drawn melody lines or to double time a hi-hat roll you just couldn’t play fast enough on your midi controller, the Transform window is your friend.
3) Edit Your Key Commands
If you’ve used any software long enough, you know that key board shortcuts can improve your workflow ten fold. The best part in Logic is your ability to make them more comfortable for you and your use. Edit yours by visiting the Preferences button and find Key Commands on the bottom.
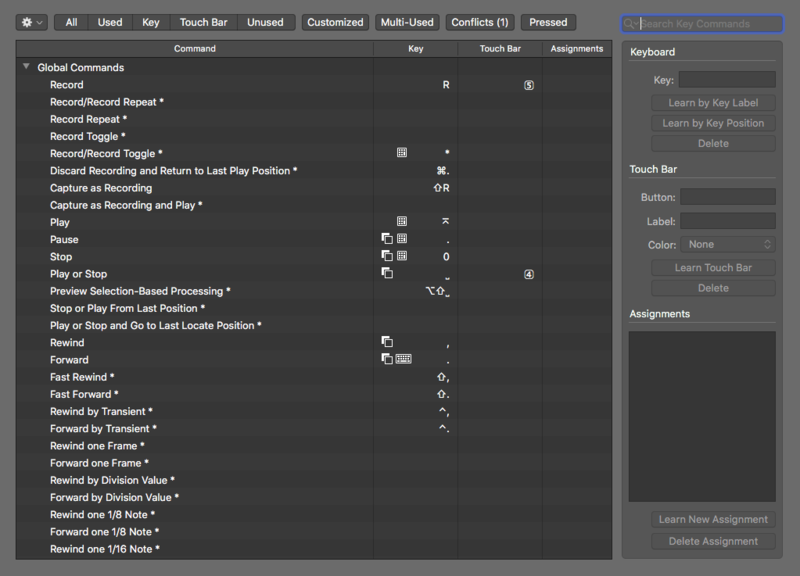
Here you can search for any command you’d like to use. You can even use this for learning where commands are that you are struggling with. My students who were switching from other DAWs found this the most helpful in learning Logic, as they all ready knew what they wanted to do, just couldn’t find the menu for it. Once you find a shortcut you want to modify or add, simply click “Learn By Key Label” and type out the shortcut! Be warned, if it’s all ready used by Logic somewhere else, you’ll be prompted to cancel or overwrite.
4) Space Designer’s Analog Tools
Bet you didn’t know the Space Designer could be used as an analog phaser box or for vintage circuit modeling did you? Let’s not forget that at it’s core the Space Designer is an Impulse Response player, and the idea behind convulsive imaging allows us to print virtually any space. These fun emulations, such as Redwirez' Marshall 1960A emulation, can be used to model all kinds of vintage analogue equipment, all withthin the humble space designer.

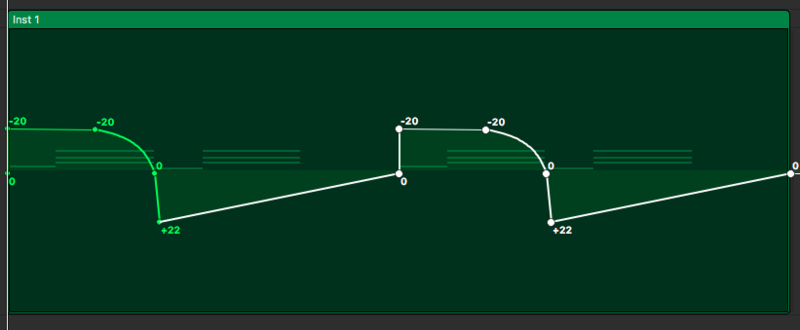
5) Copy Automation
Another tricky aspect to the Automation envelopes that people would commonly ask is how they can copy and paste a automation curve they have meticulously created easily. First, grab your Automation Select tool (easiest way is hitting the Escape key while you are in the arrange) and then drag around the first and last nodes in your automation. You’ll notice the dark highlight appears to show you that it’s now selected. Simply holding Option while clicking and dragging this selection to a new spot will copy it!
6) Organize Your Presets
If you are a big fan of crafting your own sounds within Logic’s synths and your own sampler instruments in the EXS24, you might get sick of having them in an ever growing pull down. Going behind the scenes in Logic Pro’s support files, you can easily make file folders to group those presets/sampler instruments in whatever categories work for you. You’ll need to close Logic and head to the finder. Once there you’ll go: Your Home Folder Library Application Support Logic Plug In Settings (go to Sampler Instruments to organize your EXS24 instruments). You can nest folders inside folders depending on how you want to organize your presets!

Note that Lion (10.7) users will have to un-hide their Library folder. See here: http://osxdaily.com/2011/07/22/access-user-library-folder-in-os-x-lion/
7) Step Editor Snare Rolls
If you’ve spent any time inside Logic’s Piano Roll window, you know doing intricate snare rolls, or any patterns shorter than 1/16th notes, is nearly impossible. This is where the Step Editor can really shine. To try this, grab your favorite drum synth or EXS24 sampler instrument (make sure it follows the General MIDI standard for drums, i.e. Kick = C1 Snare = D1). Create a new MIDI region and open the Step Editor. This window works similarly to a step sequencer and you can use the Pen Tool to draw in different types of hyper information. In order to achieve our snare roll, first change the Hyper Set from MIDI Controls to GM Drum Kit in the Inspector area on the left (see diagram bellow). You’ll see the parameters of the hyper set have now changed reflect your standard drum kit. Find “SD 1” and select it. In the inspector window find the Grid selector and set it to 1/32-Note. Grab your Pencil Tool and draw out your snare roll! Remember that the taller the bar you draw, the more velocity, so start close to the bottom and draw up as you go right. Use the Eraser tool to clear it to re-draw.
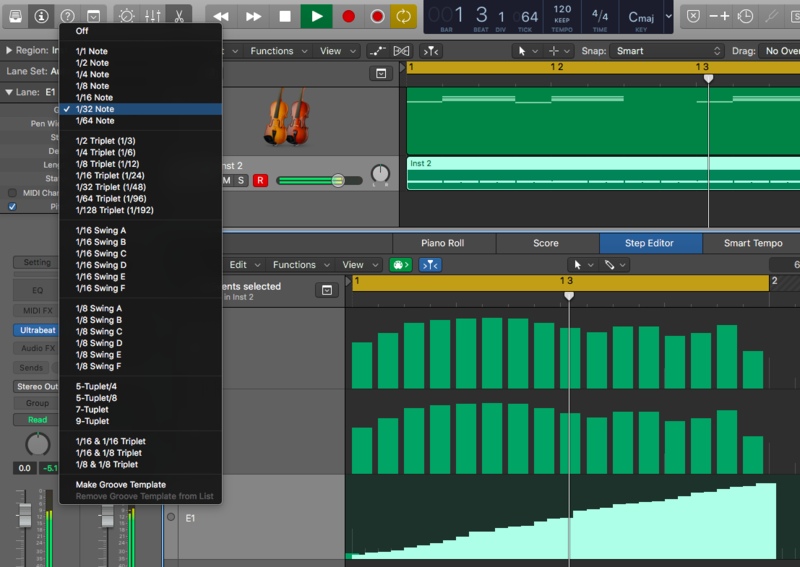
Another great glitchy-edit drum effect you can try is to set the grid to 1/96-Note. With this you can really go nuts and draw really intricate drum rolls or glitch-centric fills with ease! BT eat your heart out!
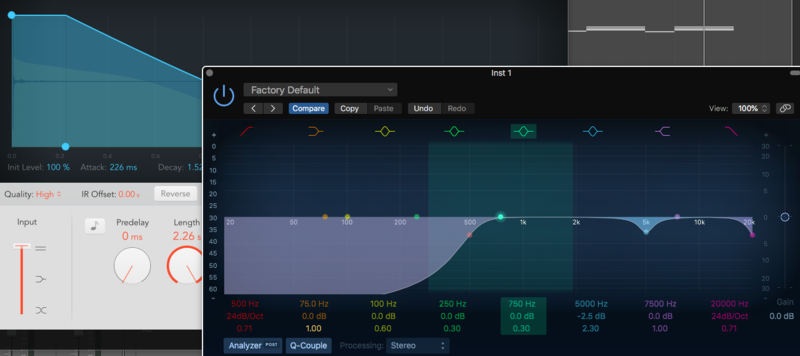
8) Great Sounding Reverb
When thinking about the application of reverb in your track, I recommend deciding how deep (or far back) you want that instrument or sound to feel, and then build yourself a aux track with your reverb unit of choice on it. If you like a fairly large and bright spring verb, try Space Designer’s “Moog Spring”. Once it’s loaded on your Aux channel, find the Stereo slider on the left of the reverb and flop the stereo (drag down to the Xstereo setting), also make sure your dry amount is on mute and your wet is on 0db. Next drop in the Linear Phase EQ to the insert under the Space Designer, and turn the low shelf on, dragging it to somewhere above 500hz. You can also carve out any other frequencies that you feel the reverb shouldn’t effect. A common one I’ll do is drop out the 5khz range if I’m planning on using this on vocals, as I don’t want the reverb to have any of the “essing” the vocals might have.
Now you can add this Aux to any track you need to by applying it by using that track’s Send knob. Turn the Send for your new Aux channel up, past the half-way mark so you can get a good feel of how this new reverb layer sounds. Make any additional adjustments to the EQ to make it feel right, then slowly drop the Send amount until the verb is barely noticeable. Most mix engineers agree, a good reverb should ONLY be noticed once you take it away. Try doing that by Option clicking the send to turn it off and on, see if you can “feel” a difference rather than “notice” that it’s a bright spring reverb.
By removing frequencies with EQ on our reverb Aux, we gain better control over just what frequencies are getting reverb. Low end usually does not play well with many large reverb types, and by removing it entirely you allow only the brights and mids to give you a rich, beautiful sounding reverb layer that won’t muddy your mix!
9) Great Sounding Delays
Another area you can struggle with is getting a good delay effect on any particular instrument. Logic comes with a few different choices when it comes to delays, and again it’s really your taste and vision as to which one you’ll pick to use. Regardless of which you go with, the same Aux and Send tricks can really give you a huge amount of control on your delays. This time on our Aux track we will grab the Stereo Delay and select the “1/8 Dotted” preset. Most delays will come with some sort of HP/LP filter, and Stereo Delay is no different. Here it’s the “Low Cut” and “High Cut” which gives you only two points to work with for removing unwanted frequencies. Let’s forget about that and make better frequency adjustments for our delay by adding in the Linear Phase EQ under the Stereo Delay. Again we want to think about what frequencies we want to have delayed, and this time will make it very specific. Drop out 100hz, 600hz, and 9khz. It’s really best to experiment with the frequencies in the instruments or vocals you will apply this too, so have fun with making various adjustments.
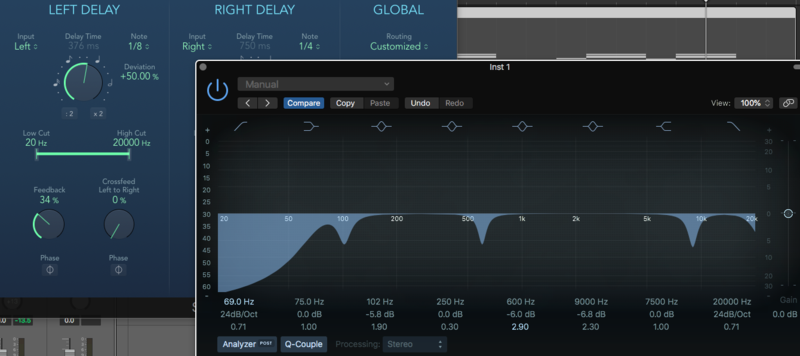
(Notice how I never say boost? In EQ the worst thing you can do in it is gain up certain frequencies, as EQs apply artificial gain that can make the adjusted frequencies feel harsher than they should!)
Lastly, experiment with adding a filter or your favorite effect in the next insert. For me, I like the EVOC 20 Filter Bank. Grab the “8 Stage Filter Dive” preset, this will give your delay a resonating, up and down filtered effect! Adjust the Send amount on any track you want to apply to this delay, treating it the same as you did your reverb Aux. Dial it up until you can really notice it, make your EQ tweaks and try different EVOC settings until it feels good to you, then drop it until it’s barely noticeable in the mix.
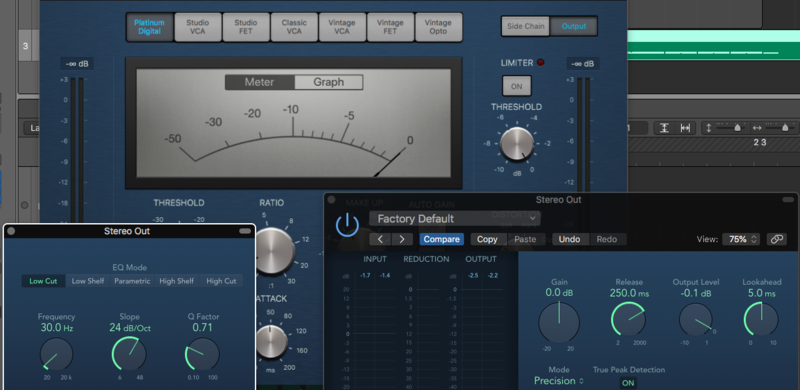
10) Quick And Dirty Master
Mastering is probably the most ambiguous term in producing music these days. Like most, I’d highly recommend finding someone to do this for you, as it’s a skill that requires your brain to be in a purely technical mindset and not a creative one. Besides the fact that having a fresh pair of ears going over your work can really help find the things you might have over looked! However, there are always times when you just want to hear your track louder, and this is where you can apply what I call a “poor man’s master”.
If you gain staged your mix correctly, you should have a good amount of head room on your master output (i.e. the mix isn’t hitting red, and sitting between -3dB and -6dB at it’s loudest moments), and if you were to mix this down to show as a demo or upload to SoundCloud it will feel quiet in comparison to other finished music. To fix this, let’s apply the following inserts on our Output Channel:
EQ Single Band Low Cut – set this to 30hz. By doing this, we remove the sub harmonic frequencies in our mix that we don’t need in recorded music.
Compressor – use the Compressor Tools Platinum Analog Tape preset. This will give you a clean and even compression. Drop your threshold until you get around 3dB of gain reduction.
Adaptive Limiter – Here’s where we will make up the gain and get a nice and loud mix down. Set your Adaptive Limiter’s output ceiling to -0.1dB. The reason behind this is, not all play back devices have an “absolute” 0dB hard clip, in some it’s actually a minuscule amount under it! To make sure that your file won’t clip out no matter where it’s played, it’s common-place to set your final limiter with this in mind. Lastly, if you want it hot and loud, feel free to use the Gain knob to pump it as loud as you want. Be warned, the harder you drive it, the less dynamics (correlation between your quietest and loudest moments) you’ll have.
I hope these ten tips can take some of the weight off your shoulders the next time you are knee deep in a Logic session!
About Colin C
Colin C. is a musician and audio engineer, a veteran Logic user and was a certified Logic Pro instructor for Apple Computer for over 4 years. He currently runs The Cell Studio in Los Angeles California with his work featured on such TV shows as “True Blood”, “Bones”, and “The People’s Choice Awards”. http://facebook.com/thecellstudio