If you want to breathe new life into your drum loop library, Cubase has the tools. You just need the know‑how! This is the first part of a three-part series.
Lots of musicians use commercial loop libraries, and in particular drum loops, as a key part of their creative process. Usefully, Cubase provides a variety of ways to help you get a little extra mileage from your existing audio loop collection. There are some obvious items in this toolbox — Groove Agent ONE, Beat Designer and LoopMash, to name just a few. Each has something to offer in its own right, but making them work together opens things up even further.
There’s too much ground to cover in a single article, so I’ll start this month by looking at how to prepare your loops to make them easier to access in Cubase, and at what Groove Agent ONE can bring to the party. I’ll look at some related tricks and techniques in later issues. The emphasis here will remain firmly on drum loops, but do bear in mind that many of the principles can be applied to other material.
Media Mogul
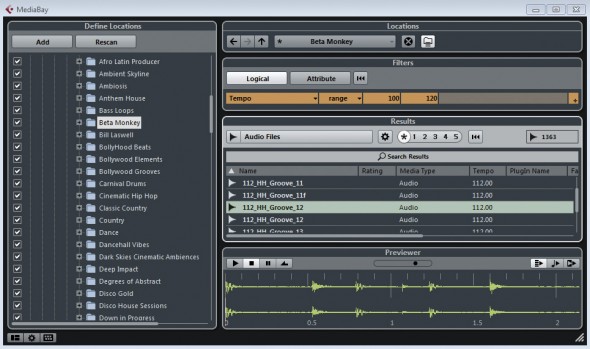
Before you can do any manipulation of your loops, you have to get them into Cubase, and for loops (drum or otherwise) probably the most efficient route is through the MediaBay. We covered this process back in the August 2008 issue of SOS and it’s changed only a little since then, so before I hear cries of ‘Grandma’ and ‘suck eggs’, I’ll suggest that interested readers can take a look at that piece as a quick refresher.
Essentially, you just need to let the MediaBay scan your hard‑drive folders containing audio loops, so that it can catalogue them and log their original length and tempo information. If you have a lot of loops, this would be a good time to cook dinner…
As shown in the screenshot above, once they have been catalogued, loops can be browsed or searched using a combination of filters (for example, a tempo range). They can then be auditioned in the MediaBay, and if you like what you hear, you just drag and drop them straight into the Project window.

The MediaBay provides the best way to catalogue your audio loops for use in Cubase projects.
Slice, Slice, Baby
When dropping loops into the Project window, you can put them onto an existing audio track, but if you drop them on an empty spot in the Project window, a new track will be automatically created. By default, the loop will be tempo‑matched to fit the Project tempo and, provided the Musical Timebase button is engaged in the Track list, the loop will be automatically adjusted to accommodate any subsequent Project tempo change — all of which is very neat.
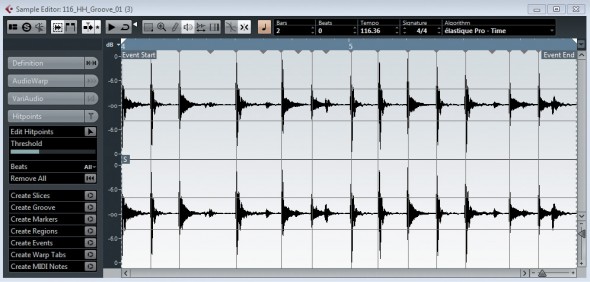
The next step is to slice the loop into individual drum hits, along the lines of Propellerhead’s ReCycled REX files. Leaving aside actual REX files for a minute, if you drop a WAV or AIFF audio loop, a standard audio event is created. This needs to be opened in the Sample Editor to start the slicing process. Select the Sample Editor’s Hitpoints tab and then adjust the Threshold setting. Hitpoints will be automatically created, and for most drum loops it’s usually fairly easy to catch all the main transients. If required, hitpoints can be manually adjusted, added or deleted: clicking on the Edit Hitpoints button makes them editable.
One click of the Create Slices button and the audio between each hitpoint is turned into a slice. Note, however, that you might get a warning message asking you to disable Musical mode for this audio before the slices can be created. The Sample Editor will then close, and an audio part — essentially a series of audio events (one for each drum ‘slice’) glued together — will appear in your project, replacing the original audio event.

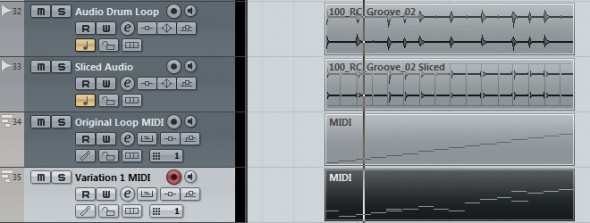
A single two‑bar audio loop shown (top to bottom) in its original form, sliced as an Audio Part, triggered via MIDI using GAO and as an edited version of the MIDI part, to create a different loop. All four tracks would adjust to accommodate any changes to the project tempo.
Getting Groovy
The cataloguing and slicing processes outlined above are an essential pre‑requisite for the first of our more creative loop manipulations. Groove Agent One (GAO) is very respectable as a sample‑based drum tool, supplied, as it is, with a broad palette of drum samples suitable for various genres. However, with your favourite drum loop sliced and ready to go, GAO also becomes a very useful loop manipulation tool. There are two key possibilities here.
First, and most simply, if your drum loop audio part is opened in the Audio Part Editor, individual slices can be dragged and dropped onto one of the GAO drum pads. You might, for example, take the best kick, snare and hi‑hat slice from your audio loop, drop these onto three empty GAO pads and then use a MIDI track to trigger these pads to create a new loop, or to add extra beats over the top of the existing audio loop. Either way, you get additional loop variations but based upon the same drum sounds as your original loop.
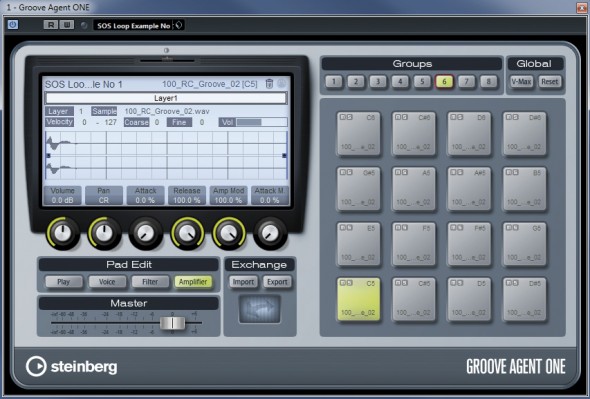
Second, and a little more complex, if you select all the slices in the Audio Part Editor and then drag and drop to an empty GAO pad, the slices will be mapped across a series of pads, starting with the one you dropped onto (to keep things as straightforward as possible, make sure you have a suitable series of empty pads before you drop!). When you perform this multiple drag and drop, GAO also does some MIDI magic and creates a MIDI loop suitable to retrigger the original loop with all the samples played in sequence.
In GAO’s Exchange pane, the double‑headed arrow button should light up. If you then drag and drop back from this button to the Project window, the MIDI loop can be placed on an existing MIDI track or used to create a new MIDI track. Either way, if that MIDI track is then routed back to GAO, the MIDI loop will trigger the appropriate pads in sequence to recreate the original performance of the audio loop.
Not only does this MIDI triggering allow you greater flexibility in terms of tempo adjustment than audio time‑stretching, but you now have a fully editable MIDI loop that you can copy and edit to create endless variations on your original audio loop. This is extremely useful if you perhaps find one or two really cool loops but need to create some fills, a couple of extra variations, a breakdown part and a suitable ending to make a complete arrangement. These can all be built using MIDI and based on the original sounds in your audio loop(s).

The Sample Editor hitpoint system can be used to slice your drum loop into individual beats.
Vexed By REX
Of course, this ability to slice and generate MIDI-controlled playback is, essentially, Steinberg’s equivalent to the Propellerhead ReCycle/REX functionality, and if you drag and drop a REX file from MediaBay it automatically appears as a pre‑sliced Audio Part. However, rather surprisingly (surprising to me, anyway), you can’t then drag these slices from the Audio Part Editor to GAO. At least, I’ve never been able to do that — so if you have more success with it than me, please let me know!
There is a very simple workaround, though. Having dropped your REX file into the project, select it and then choose Audio/Bounce Selection. This will create an ‘unsliced’ version of the audio loop, which you can process as described above for WAV and AIFF files. This is a minor additional chore but works well — although it is best to change the project tempo to something close to the loop’s original recording tempo prior to executing the Bounce Selection command, as this reduces the likelihood of creating unwanted audio artifacts. Once the Bounce Selection is done, you can re‑set the project tempo.

Groove Agent ONE, with a sliced loop mapped across its pads. For such a simple-looking VSTi, GAO offers a surprising amount of functionality for working with drum loops.
Special Agent
Of course, having got the sounds from the loop into GAO, as well as rearranging the loop you can also tweak the sounds for each pad, using GAO’s tuning, waveform and filter editing options. Finally, with the sounds in GAO and the loop controlled via MIDI, drum replacement also becomes an easy option — so if you want to take the feel of an electronic hip‑hop drum loop but play it with an arena‑style acoustic rock kit, the choice is yours.
While GAO has plenty to offer when it comes to squeezing extra mileage out of your drum-loop collection, as mentioned at the start of this column, it is not the only useful tool in the Cubase box. In the next part of this series, amongst other things, we will take a closer look at what Beat Designer can offer. Until then… happy looping!
Read Part 2 here
Original source here.


