This Ableton Analog Tutorial demonstrates how to carve out a nice, phase-ey retro synth pad with Ableton's Analog. Here are a list of steps to demonstrate this process.
Step 1
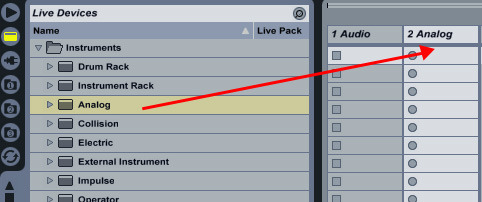
Start off by dragging a copy of Analog onto a new MIDI track. Simply drag a copy of Analog from Ableton’s device window onto a new MIDI track.
Step 2
Program a couple of chords into your piano roll window. I decided on an A Minor to a B Minor Aug5.
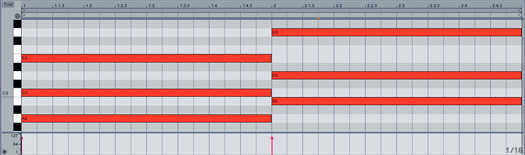
The chord sequence I am using for this tutorial. A Minor notes are: A2, C3 and E3. B Minor Aug5 notes are B2, D3 and G3. This sequence is set to a 2 bar loop.
Step 3
Next, we’ll quickly change the routing of our newly created Analog synth. Locate the routing section by clicking on the main panel (1) and clicking the “Quick Routing 2″ option (2) under the routing section in the middle of the device.
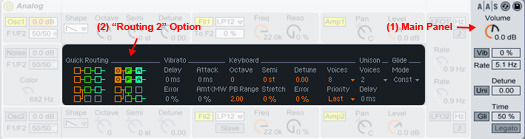
Changing to Quick Routing 2 allows for both oscillators to be fed directly into their own filter, and finally their own amp section. This means better control over shaping our sound.
Step 4
Be sure to activate the second oscillator by clicking the “Osc2″ (1) button at the bottom left of Analog. Also, be sure to lower the volume on each oscillator from 0.0dB to -5.00dB on each.
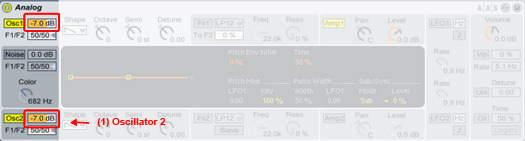
Lowering the volume of both Oscillators in Ableton’s Analog will help prevent some clipping as we sculpt the sound.
Step 5
Next, locate both Filter Section 1 (1) and Filter Section 2 (2) (“Fil1″ and “Fil2″) and change Filter 1 Freq knob to 4.0k and Filter 2 Freq knob to 1.0k. This helps to smooth out the sound. After that, be sure to change the filter mode to LP24 on both oscillators for a higher quality filter.
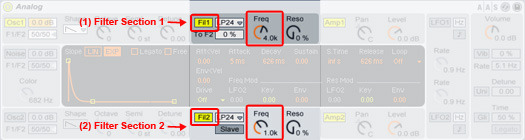
Smoothing out the sound with both of Analog’s built in filter sections.
Already you can hear the sound losing some of it’s high end, helping making it sound a bit for lo-fi.
Step 6
Head over the both oscillator sections and change OSC1′s detune knob to 0.08 and OSC2′s detune knob to -0.05. Also, change OSC2′s wave form to a Square wave.
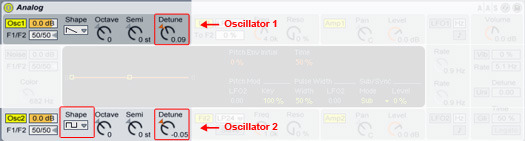
Both of Analog’s oscillator’s are at the heart of shaping your sound based on their selected waveform.
You can hear that adding another oscillator and de-tuning them has helped fatten up the sound a bit.
Step 7
Here is where the real sound shaping starts to take place. Click on Amp1 (1) and bring the attack to 1.0s, the sustain to 1.0, the S.Time to inf s and the release to 1.10. Also, under the Pan Mod and Level Mod settings, change LFO1 to 0.50. Here are the settings for Amp1:
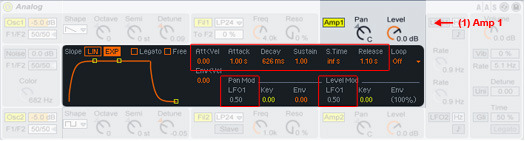
The settings on Amp1 for our retro synth pad sound. On Amp2 (2) your attack should be 2.0, the sustain at 1.00, the S.Time at inf s and the release at 1.10. Have the settings under Pan Mod and Level Mod the same, except invert the settings to -0.50. Here are the settings for Amp2:
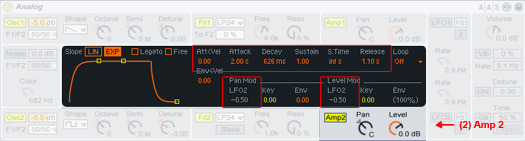
Fine tuning each Amp section gives unlimited amounts of control over the shape of your sound.
Step 8
Now for a little tweaking on both of Analog’s LFOs. Both LFOs (1) and (2) will have the same exact settings so this is pretty straightforward. Start off by both activating the LFOs by clicking the LFO buttons green. Next click the music note to change their rate to tempo match. Lastly, both change rate knobs to 1/4.
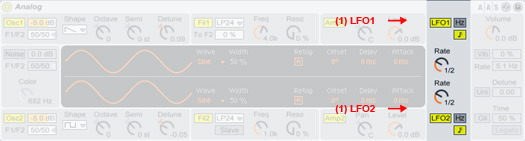
Activating the LFO ensures that the settings we made in our amp section will give us a hazy rotating effect.
Step 9
Lastly, the effects chain. We’re going to drop a copy of Ableton’s “Phaser” on the track with the preset “Acoustic Cascade” with the Dry/Wet knob dropped down to about 35% (we will go into a more in depth tutorial on the phaser at a later date).
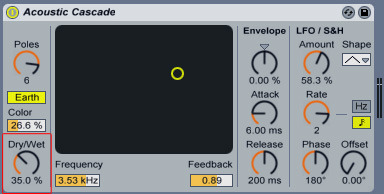
For now, the “Acoustic Casecade” preset works fine for the desired sound. Be sure to keep the Dry/Wet knob around 35% for a more subtle sound.
Original post source: here