A Follow Action is a small set of instructions which can be applied to an Audio or MIDI loop, telling it what to do once it has finished playing.
When I first began teaching, I was very surprised at how many of my students didn’t have a grasp of Follow Actions and how powerful the function is to free up valuable time while you go off and be creative somewhere else.
To me, this has been one of the most useful functions of Ableton, and I use it throughout my live performances.
Example
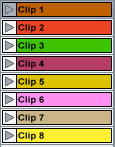
Lets say you are playing a tune from the beginning, and there are 128 bars until the first breakdown. Over those 128 bars you have 8 x 16 bar percussion loops that play one after the other, each adding in more elements, getting busier, until the breakdown where they stop and no clips are being played.
You could manually trigger each loop one after the other, just as the last one is finishing, but this is not that much fun and is just a process needed to keep the tune moving along. The solution to this is to assign Follow Actions to these clips, so that when clip #1 comes to an end, clip #2 automatically kicks in (and so on and so on).
To set Follow Actions to all these clips, simply select all the clips (clicking the top clip, holding down the shift key, and clicking the bottom clip), then opening the Launch options box, down the bottom right (if it is not already open, click the small circle button with an L).
You will see a small section called Follow Action.

The first three boxes can contain numbers, and specify how long the clip needs to play before the Follow Action you assign kicks in. By default, the first box has a 1 and the next two are left blank. This means that the clip will play for 1 bar before executing the Follow Action. However, we want these clips to wait 16 bars before changing, so change this box to read 16. (Alternatively, if we wanted the Follow Actions to kick in after half a bar, we would leave the first box empty, and put 2 in the second box, meaning after 2 beats, apply the Follow Action).
Now we have designated a Follow Action time to these clips, we need to tell them what to do once those 16 bars have been played, this is what the left drop down menu below the three boxes is for.
Each item in this box causes a different effect once the clip has finished playing. These are:
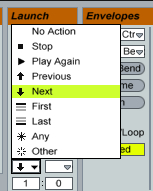
For this example, we want each clip to move forward one when it finishes playing, so select Next
Now, when any one of these 8 clips is triggered, you will see the clip below it flashing, this indicates that it has been instructed by the Follow Actions of the clip you just triggered to begin playing next. This will continue down as each new clip gets triggered by the Follow Action of the previous clip.
The last step is to select the last clip in the group, and change the Follow Action to No Action. If this last clip has Next like the rest of the clips, it will shoot back up and trigger the first clip in the group again and the cycle will be repeated.
Bonus Tip #1
Follow Actions aren’t just used for automating clips so you can free up your hands to do other things within your live set, you can use the various follow functions (any, other, first etc) to automate some interesting combinations. One of my favorite things to do is to use them to do quick edits of drum hits on the fly.
The Edit clips below the original drum hit can be assigned a Follow Action to play one bar, then go back to the First clip, so whenever I want a little bit of variation in my drum loop (at the end of a phrase etc) I can trigger an edit clip, and know it will only do the fill clip for one bar, then snap back to the original clip. All the work is done for you and creativity can be spent elsewhere doing something less mundane.
Bonus Tip #2
The randomness of the Any Follow Action can be great for keeping things alive and fresh.
Try adding 8 clips, with a different sounding drum hit on the first beat, and assigning the Any Follow Action to all the clips, and the duration to 1/16 beat (put 1 in the last box, and leave the first two blank). This will zip around each clip at random, playing a new hit on every 1/16th beat. Quite chaotic, but with a bit of thought, the possibilities are endless.
To make things less chaotic set the duration to a bar for example and trigger mode of each clip to Legato – this way each clip will pick up exactly where it should in terms of where you are in the bar , making for variations that still maintain a more consistent groove. Make sure you have Legato selected on each clip.
Bonus Tip #3
Notice how there are two drop down menus and an extra set of boxes below? This is so you can add an extra element of chance to your Follow Actions. If the first drop down menu has First and the second drop down menu has Last, there is now a 1:0 (100%) chance that the first Follow Action will happen. If the boxes blow both contain a 1, there is a 1:1 (50%) chance that the Follow Action will either go to the first clip, or the last clip. If the boxes contain 2:1 there is a two to one chance the Follow Action will trigger the first clip and so on.
Conclusion
As well as being great for automating processes that can be mundane so you can spend more time experimenting and improvising, Follow Actions provide a new way to quickly spark up new ideas, letting the computer self generate potential patterns and ideas which you can keep for later and expand on.
Original source http://www.cosm.co.nz