
If you’ve mostly used a vocoder to produce the ubiquitous ‘singing synth’ effect, you might not have thought of it as an EQ, but at it's heart, that’s what it is. The sound that gets equalised (the synth in the ‘singing synth’ model) is called 'the carrier'. A different sound, called 'the modulator' (the voice in the ‘singing synth’ model), modulates the EQ band levels. Thinking of it in this way reveals many applications that you might not, at first, call on a vocoder to do. To show you what I mean, let’s look at a few simple examples, and then move on to more complex applications to see just how much a vocoder can actually do in your productions.
If you use Live’s Vocoder plug‑in as an insert effect, the sound on the track onto which it is inserted becomes the modulator, and it is that sound’s frequency spectrum you see in the vocoder’s central graphic display.
Settings for Bands, Range, BW, Gate and so on are also displayed at the bottom of this section. Notice in particular, the green dashes across the top of the graphic display: these act as level faders, allowing you to individually attenuate each band. Each one can be grabbed with the mouse, and set as you like.
The 'carrier signal' for the vocoder is chosen by using the drop‑down menu at the top left of the control panel. ‘External’ is the most useful choice for our purposes: it lets you use the output from any audio, virtual‑instrument or return track, as selected in the 'Audio From' menu below it. This is also the choice you’d make for the ‘singing synth’ effect.
Vocode Thyself
When you want to use the vocoder as a single‑source processor (for things like formant shifting, gating, and dialling in your own EQ curve), insert it on the track you want to process and choose ‘Modulator’ as the carrier. Try that, for example, with a pad or ambient sound. The default settings make a good starting point, and it is instructive to simply toggle the vocoder on and off. You’ll notice that even the default settings significantly colour the sound - not necessarily a bad thing.
The first adjustments to try are with the band levels; you might want to even out the spectrum or do just the opposite and emphasise a few bands. Low to moderate band counts work well - just four can often be very effective. Audition the vocoder with the dry/wet control set to 100 % wet, and don’t worry if it doesn’t sound great, it’s just to get an idea of how the vocoder works & sounds. In the end, you’ll use a mixture of dry/wet and the vocoder will just add some colour. Other controls I often use for pads include setting the Range top at 8kHz, the Depth to 50 %, and the Formant to + or -12dB. Give these a try and see what you think.
Repetitive synth bass is another good target for self‑vocoding. Sounds without a lot of harmonic structure work best, and four or eight bands is a good starting point. Attenuate the lowest one or two active bands, raise the Level control as much as needed (often the full 24dB if there’s not much in the spectrum above the first couple of bands), and automate the Formant knob’s Clip envelope to create accents. Here again, the dry/wet mix control is important.
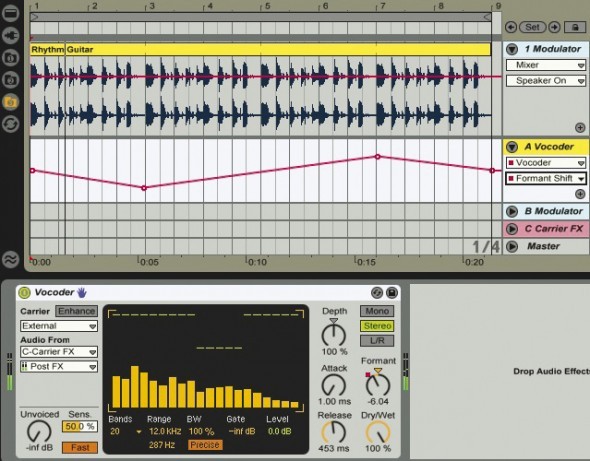
Things get more interesting when you use effects to process the modulator but not the carrier. That’s impossible when ‘Modulator’ is chosen as the carrier, so instead, choose ‘External’ and then select the track holding the vocoder. This automatically siphons off the carrier's pre‑effects, so any effects you place before the vocoder, apply to only the modulator.
This works best for frequency-based effects, such as Auto Filter with a good dose of LFO applied (one of my favourites). You’ll probably want to use this process with a fully wet mix because the vocoder’s dry/wet knob taps the processed modulator, not the pre‑effects modulator used for the carrier. Try it with lead or rhythm guitar and keyboard parts.
Beat Repeat is set to capture the first 16th note of each bar in this two‑bar clip, and repeats it six times with descending pitch. In the first bar, there is nothing to capture and repeat at the first 16th note, so, because Beat Repeat is in Gate mode, a vocoder modulator feed is generated only every second bar.
A More Flexible Approach
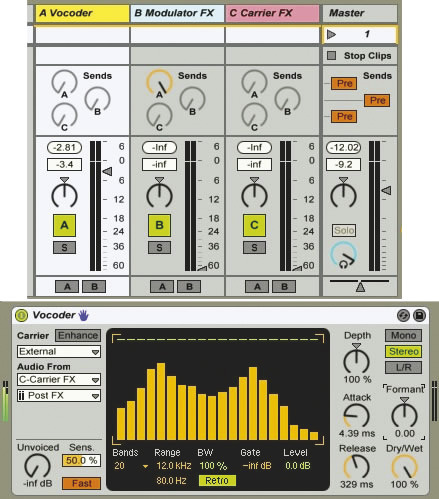
The single‑track approach just described goes only so far. For example, suppose you want to process the carrier and modulator separately, or to freely mix and automate song tracks while also using them for vocoder feeds? You can add separate song tracks for modulator, carrier and vocoder, however, when deep into a project and you want to add a vocoder for some spice, it can be easier to use Return tracks for everything.
Here’s a useful setup:
• Create three Return tracks (I’ll assume they are A, B and C).
• Set each of their send‑modes to Pre (on the Master track).
• Insert the vocoder on A.
• Ctrl‑click Return B’s Send A knob to enable it, and turn it all the way up.
• Set the vocoder’s carrier to Return C, post effects.
Now use Send B from any of your tracks that you want to mix into the modulator, and use Send C from those you want to mix into the carrier. (For complex processes, you may well want to send some tracks to both.)
Here are a few things to keep in mind when using this setup:
• Place effects plug‑ins for processing the modulator and carrier on Return B and C, respectively.
• Use the Return B and C levels to audition those effects. (You’ll probably want to turn the levels all the way down after they’re set up.)
• Set the vocoder’s dry/wet mix to 100 percent wet.
• The mixer levels of the tracks or groups that feed Returns B and C determine the amount of unprocessed modulator and carrier (if any) that appear in the final mix.
Expect The Unexpected
Now let’s look at some of the more outré effects that can be achieved with Live’s vocoder. Using it in conjunction with other effects usually produces some interesting results. You’ll find you can create unusual feedback‑delay and reverb effects by using extreme settings for those effects on the carrier while leaving the modulator unprocessed. Instead of the tracks being completely buried in the tail of the extreme delay or reverb, you’ll hear just the hint of that effect allowed through by the dry modulator.
Start with rhythm guitar, rhythmic background vocals or similar, sent to both the carrier and modulator (sends B and C in the setup described above). Place a 100 percent wet long‑tail reverb on the carrier return track (C) with a vocoder Release setting of around 500ms. As an alternative to reverb, try a Simple Delay with different delay times in the right and left channels. In either case, you’ll probably want some of the modulator in the mix. For that you can use the Return B level. To create motion, automate the vocoder’s Formant knob. The effect should resemble a mild phase shifting of the vocoded sound.
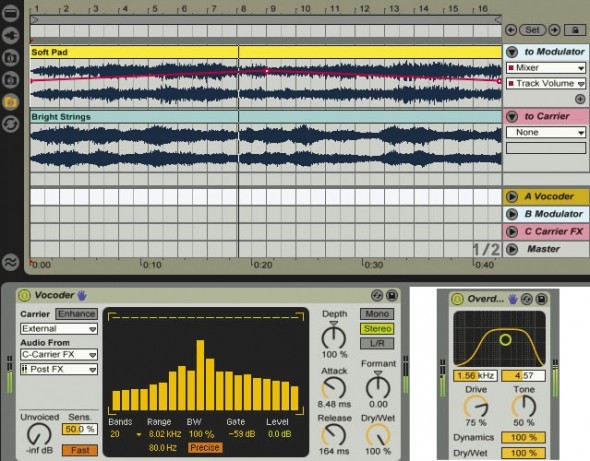
Here a lower‑register pad sound is used for the modulator and a bright string sound is used for the carrier. Overdrive (shown in the insert) is applied to the modulator and the amount of the modulator in the mix is automated. The result is markedly different from the original pad and strings.
You can completely change the character of a pad or ambient sound by vocoding it with another sound of the same type, coupled with extreme processing. Use the sound with the lower register as the modulator and insert one of Live’s distortion effects - Erosion, Overdrive, Redux or Saturator - on the modulator return track (B). There’s no predicting what processing will produce interesting results, so start by stepping through the presets for each of the effects while listening to the vocoded result.
You will almost always find something interesting with a flavour far different from the unprocessed carrier. For this setup generally use 20 bands, no gating or formant shifting, and moderate attack and release. Leave a good dose of the unprocessed modulator and none of the unprocessed carrier in the mix.
Beat Repeat (covered in last December’s Live Technique) is another excellent choice for modulator processing. It works best on bright, rhythmic material such as synth patterns. The key to not overdoing it is to ensure that Beat Repeat is in Gate mode and isn’t gated too often (focus on its Interval, Offset and Chance knobs).
For the carrier you can use almost anything, from flowing sounds to other rhythmic parts, and most kinds of carrier processing are fair game. Audition the Modulator effects return track (B) and fiddle with Beat Repeat until it spits out something nice every couple of bars or so. If you don’t care whether the intervals are regular, just adjust the Chance control for density. For this setup I always set the Modulator effects (B) and Carrier effects (C) return levels to minimum but keep some of the unprocessed modulator in the mix.
As is probably clear, there are few rules aside from the requisite routings when you use the vocoder in this way. One thing to keep in mind is that there must be sound present at both the modulator and carrier inputs to produce any output - this is easy to overlook when you’re dealing with complex routings and multiple tracks.
Also, you cannot vocode a bass with a mosquito: the sounds must overlap in frequency to some extent. (Alternatively, you can bring them in line by adjusting the vocoder’s Formant knob.) And remember, you can apply everything described here to virtual instruments in live performance, if you’re willing to take a few chances.
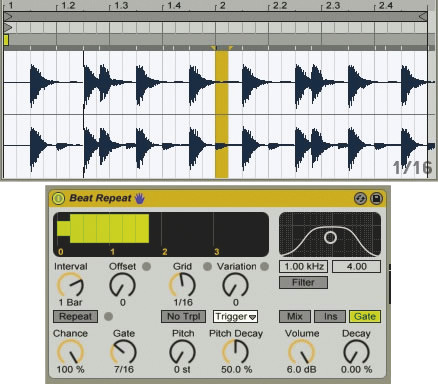
Beat Repeat is set to capture the first 16th note of each bar in this two‑bar clip, and repeats it six times with descending pitch. In the first bar, there is nothing to capture and repeat at the first 16th note, so, because Beat Repeat is in Gate mode, a vocoder modulator feed is generated only every second bar.