
Consider this your challenge for today. Take a song that you just recorded, or have been working on and mix it in 15 minutes. Shut off everything, pull the faders up and follow the following tutorial. Use a stopwatch to keep track of time and when you should be switching tasks.
Ready? Set. Go!
Minutes 0–2: Balance & Pans
One of the best places to start a mix, especially when you’re in a rush, is the chorus. Alternatively, find the busiest part of the song and start there. The place where most of the instruments are playing at once is the most effective place to mix. You’ll hear all the instruments clashing with each other.
Once you’ve found the busiest part of the song, it’s time to find a good balance. Throw out the common mixing tip of starting with the foundation. Start with all faders up and quickly move them around until you get a relatively good balance. Remember, you only have two minutes so you have to act quick.
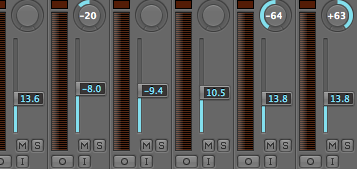
While you move the faders, use the chance to pan the tracks around. Stick to the general guidelines:
- Kick, snare, bass and vocal in the center.
- Spread the toms from right to left.
- If you have two rhythm instruments, pan them to each side so that they each have space to breathe. You can do hard left and right if you wish, or you can be more conservative.
- Spread the backing vocals around the center.
- Keep stereo pads in the center.
- Pan lead instruments off center.
You should be able to get a pretty good mix going immediately. Especially if you’re working with well recorded tracks.
Minutes 2–5: Subtractive EQ
Now that you’ve got a good balance, break out your EQ. Don’t worry about the make and model, just whatever you’re comfortable with and use often. Only use this EQ to cut unnecessary frequencies from every instrument.
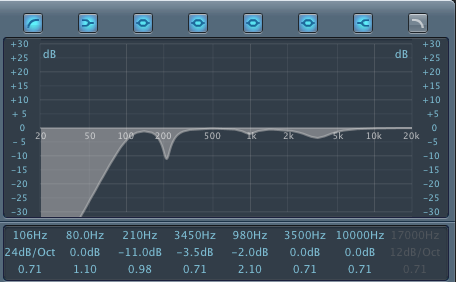
Start with filters
- Filter the bass and kick drum to around 32 Hz. Almost seems unnecessary but it sometimes makes a difference.
- Almost everything else, unless it’s a very bass heavy instrument can be filtered up to 100 Hz.
- Get rid of the high-end on heavy bass elements. Kick drums don’t need a lot of high frequencies, and the bass usually doesn’t either.
- Use low-pass filters on doubled vocals and backing vocals to make them blend in.
Subtractive EQ Guidelines
- Cut drums at 400 Hz to get rid of boxiness.
- If the guitars are interfering with the vocal, try a shallow but wide cut at around 3 kHz.
- If the bass is too boomy, cut in the area from 140–250 Hz.
- If the vocals sound too nasally, cut around 1 kHz.
For other problematic areas, scanning around the frequency spectrum with a narrow boost will often reveal annoying characteristics that need cutting, such as snare drum ringing or hissy guitars.
Minutes 5–8: Compression
For the purpose of this exercise, presets are allowed. As I’ve said before, A Preset is a Starting Point! However, make sure that the ratio and threshold are actually doing something. Because if the signal isn’t hitting the threshold, nothing is being compressed.
It’s fine to use a “Rhythm Guitar” compression preset, or “In Your Face Vocals!” as long as you tweak the threshold and ratio to your liking. While you’re at it, make sure that you compensate the amount of dB compressed with additional make-up gain. Meaning that if you’re compressing 4 dB on average, boost the makeup gain to about 4 dB to compensate (if you aren’t using automatic make-up gain with your compessor)
Minutes 8–10: EQ Enhancement
Around this time your mix should be sounding pretty good even with minimal adjustments. It’s crazy how far balance, EQ and compression can go. Now you can add some sparse EQ enhancement to your tracks.
For instance:
- Boost the low-mids of a guitar track to bring out some punchiness.
- Bring out the presence of a vocal around 5 kHz.
- Add shimmer to cymbals with a high-shelving EQ from 12 kHz.
- Boost the body of the snare at 500 Hz, or alternatively bring out the attack at 3 kHz.
Don’t try to boost the same frequency in many instruments. Make each instrument have their own respective boost, in their own area. Otherwise they might clash and you’ll cause more problems.
Minutes 10–12: Delay and Reverb
Look at the reverbs and delays from a live sound perspective. Live engineers sometimes have very limited resources but they can make just a few processors go far.
• Insert three auxiliary sends, one for drums, one for instruments and one for vocals.
• Get a warm chamber or a diffused hall reverb of some sort for the drums. You don’t want it to be too reflective since it will easily muddy up the mix. A gated drum reverb was very popular when I was doing live sound so search for something of the sort.
• Send all your other instruments to a medium sized room. Now here’s the trick. Have the reverb fader all the way up (to zero dB) and then send each instrument to the reverb. Depending on how far back you want to push the instrument depends on how much of the instrument you send to the reverb. The more reverb you apply to each instrument, the more space you will hear around them. This is a very quick and dirty way to create depth and separation between instruments.
• Don’t drown the vocal in reverb so use a separate aux track for it. I would recommend a medium delay that thickens up the vocal, adds space to it while still keeping it in the forefront of the song. If you want, you can add reverb after the delay, essentially making your delay work as a pre-delay for the reverb.
These three effects track should be enough for a lot of band-driven songs. Sometimes less is more effective.
Minutes 12-15: Automation & Reassessment
Use the last three minutes of your time to rebalance your tracks. After the EQ, compression and effects, your original balance might be a little off.
You should be able to get back to the original balance by moving the faders around. Now you’ve got a balanced, EQed, compressed mix with depth so the only thing left to do is to add little automations here and there to make the mix breathe.
Original source – here