As most producers will tell you, eq’ing your sounds so they occupy the appropriate space in the frequency spectrum is CRUCIAL to achieving a well balanced mix. Not only will this provide clarity of detail in the mixdown, but it will also ensure you have as much valuable headroom as possible for the mastering stage. You’ll then be able to sculpt and enhance the final mix with ease – to get it as deep, crisp, LOUD and intelligible as your music deserves. Increasingly and over time, your ears will tell you what needs attention – and your experience will guide your hand. Until then however, and to aid you in this journey, you’ll want to employ the use of spectrum analyzers to visually verify your eq decisions. In this tutorial I’ll show you just how this is done and why it can save you loads of time.
Although we are using Ableton Spectrum analyzer you can use any plugin or DAW Analyzer.
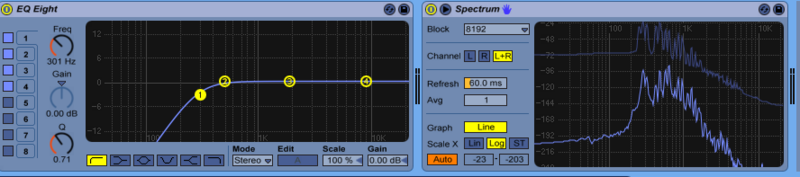
There are many different 3rd party spectrum analyzers that have lots of different and useful features; some parametric eq’s (such as Izotope Ozone’s EQ) have spectrum analyzers built in so that you can adjust your eq bands and see the direct effect visually represented in the same GUI. However, for the sake of universal practicality, here I’ll use Live’s built in EQ8 and ‘Spectrum’. Just drag and drop them on your channel the way shown below. Here I have them on a pad sound, which has lots of mid-range content that can sometimes get out of hand, creating offensive frequencies that result in harshness in the mix. We’ll want to remedy that…

Hit play in Live and let the sound play – notice the frequency readout on Spectrum start moving and fluctuating according to the frequencies in the sound. You can see where certain frequencies peak consistently and occupy the same space in the spectrum. Therefore you know that you’ll be making eq changes in that area of the spectrum.
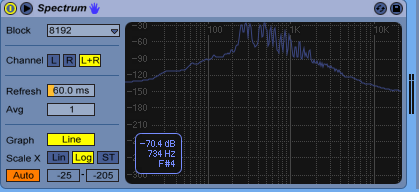
Continue listening to the sound – when you hear what is undesirable – in this case, harshness – watch what frequencies are peaking in Spectrum. Hover your mouse over that frequency range, and notice that in the lower left, there a blue panel that tells you what frequency you’re hovering over. That’s the frequency you’ll want to modify in your eq. In this case, 734 hz.
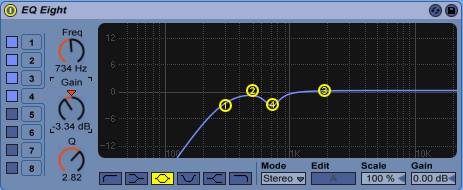
In your EQ8, on one of the bands (I chose 4) – dial in a frequency setting of 734 hz. Also, boost the Q setting so you’re affecting just that narrow range of frequencies. However, instead of just immediately cutting at 734hz, you want to turn the Gain UP, not down, in order to exaggerate those frequencies. This way you can use your ears to confirm that’s where the harshness lies.
Sometimes you’ll find that you want to sweep to the left or right, or change the q setting to accommodate more/less frequency content. The point is to exaggerate the problem, and hone in on JUST that problem, so that when you cut it, you won’t be unnecessarily cutting the desireable frequencies that make the sound what it is.
Once you’ve identified the problem frequency, and you feel confident you’ve narrowed in on JUST the problem, you can start cutting to get rid of it. Depending on how prominent the problem frequency is, you’ll want to cut gently, moderately, or sometimes extremely. Usually, less is more – as you don’t want to make it sound unnatural. Usually a cut of up to -4db is enough. Here I’ve made a cut of -3.34 db, until I can hear that the problem is gone, or tamed to the point of being unnoticeable.
Remember the golden rule of efficient EQ’ing - always CUT when you can, instead of boost! This prevents you from further complicating/muddying up your mix, and lends to getting even more headroom in the end. Headroom is the Holy Grail to getting a strong, clean and detailed sounding tune.
Original source here.