Remixing is an artform that requires a lot of skills, not least of all creative strategies and arrangement (or re-arrangement) talents, as we demonstrated in our last article on remixing. But after the musical side of your mashups, bootlegs or officially sanctioned remixes are finished, how can you tie it all together? And what production techniques will make you more likely to get great results from the start?
In this article, we’ll lay down a few production skills that’ll be indispensable for putting together creative and hard-hitting remixes. And then, with so many tools out there to make you a better producer – and some of those specifically designed to make you a better remixer – there’s bound to be something that’ll take your game to the next level.
Best Software for Remixing
Not all software is created equal, of course, and there are different packages that will serve you better or worse for your remixing goals. While some software is designed with remixing in mind specifically (Mixed in Key, for example) other packages are general audio toolkits that happen to contain functions that apply well to remixes.
You can check out a full list of very capable remixing tools in our article on the [Best Tools for Remixing, Mash-ups and Bootlegs $%%$%next article in this doc].
Audio to MIDI
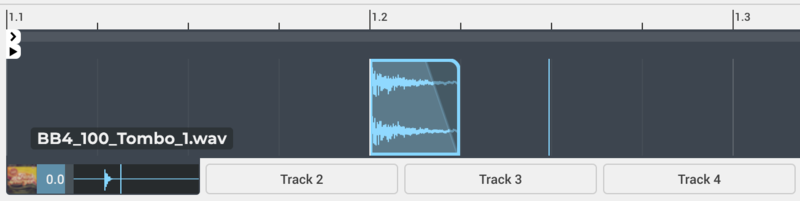
Almost every DAW has its way of taking an audio file and converting the information contained inside it into MIDI format, for sending through a virtual instrument. This means that you can easily recreate a sound using another plug-in, and flick through presets and make tweaks until it’s completely original but still great in its own right. It’s a great way of spinning stems and track elements into new forms.
Although there are different algorithms and workflows, most DAWs offer ways to change drums, melodics, and sometimes even polyphonic audio into MIDI form. In Ableton Live, for example, simply dragging an audio clip onto an instrument channel will let you choose one of three definitions to make sense of it for replaying. You could use Audio-to-MIDI for creating harmonies, replacing sounds, or even happy accidents…

Sometimes, the algorithms behind Audio to MIDI conversion can get things wrong. Whether they’re dealing with a long string of notes that they can’t understand, audio that’s too quick and changing, or polyphonic material through a melodic algorithm, there’s a lot that can go wrong. Or is it right? Depending on the instrument you put it through, the results can be intriguing.
Timestretching and Pitchshifting
Another function of your DAW’s that you’ve got to get to grips with for ultimate remixing is its timestretching and pitchshifting functions. These are essential remix tools because they’ll help shift the original track’s elements in tempo, in tuning or into a different musical key altogether. Audio warping algorithms like these usually come in a few flavours, so make sure you test out all the timestretch and pitchshift types that are on offer in your DAW.
There are plenty of third-party plugins also available to help you in your shifting and stretching endeavours. We’ll discuss a few of those in the sections below.
Harmonic Mixing and Getting In Key
Do you know the key the original track is in? If so, it’ll be easy for you to find new samples that fit in perfectly with it – you can just search for samples in the same key and the same tempo, and it’s very likely the two will work together musically. Whether they work together sonically is a different matter altogether.
Of course, if you’re using Loopcloud, it’s possible to filter millions of samples by key and tempo, making sure that everything you get will easily fit into your current project. Loopcloud can also audition all samples at a tempo that matches your project’s, so you can hear it in context before paying points or downloading it. Check out Loopcloud, including its free options, on the Pricing Page.

Audio Isolation and Extraction
This one’s a golden skill to learn if you’ve not got perfect stems or perhaps if you’re ignoring copyright and creating a bootleg (for your ears only, of course!) Taking a stereo mixdown of multiple audio sources and separating the individual parts is a bit like unbaking a cake – it’s almost impossible… although you can get closer with a few techniques.
Taking a stereo mixdown of multiple audio sources and separating the individual parts is a bit like unbaking a cake – it’s almost impossible…
It’s possible to chop out audio without using many tools, although this is very dependent on the specific sound you’re dealing with – you can’t expect it to work every time. Then again, any dodgy artefacts that do remain from an audio isolation process might not be heard easily in the final mix, are possible to disguise, and might add a cool character of their own. Perfect is the opposite of vibe.
Simple Slicing
Some audio extraction doesn’t need as much firepower as you’d think. In drum loops, for example, it’s often possible to isolate a snare or kick hit by simply slicing it out. Choose wisely which hit you’ll take, being careful to avoid other kit elements playing at the same time, or their reverb tails. You can truncate the reverb of the hit you’re taking using a fade.
For extra separation, you can try filtering or notching out other instruments’ frequencies. This is a balance between being so heavy-handed that you take out what was good about the hit you wanted in the first place, and leaving too much of the unwanted hit in.
Remember, with Loopcloud’s Pattern Editor, you can slice a hit from a loop on a certain beat/bar, and audition the same pattern with other loops, seeing what else you can extract from them. You can drag the original loop or the ‘processed’ single slice out into your DAW to use later, too.
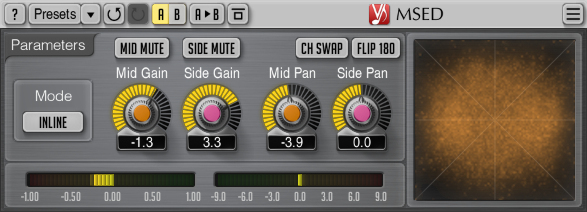
Mid/Side Techniques
Elements that have been left centrally panned in a mix will remain if you mute the entire mix’s Sides signal, allowing you more room to chop them out. A keyboard part that was panned centre-left might disappear when you do this, but a vocal might well stay audible if it was left centrally – and the reverb may be lessened as well. Kicks and snares are also possible to grab this way sometimes – it all depends on the original mix.
This is sometimes possible using your DAW’s Utility plugin, but you’ll have to make sure this literally mutes the stereo information, and doesn’t just collapse that stereo information all down to mono. A third-party option like Voxengo’s free MSED lets you mute and change the gain for either mid or side channels.
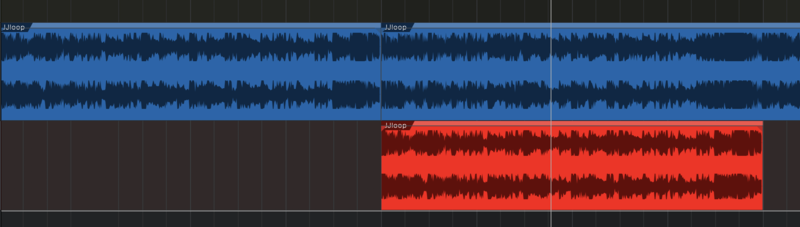
Polarity Inversion
You know about null testing, right? Two duplicate pieces of audio will cancel our completely and sum to nothing if one of them has its polarity reversed.
Depending on the exact method of mixing, and the effects that were applied to a track during mastering, it might be possible to use this knowledge to isolate and extract audio from a commercial track. Because electronic music is so DAW-dependent, and based on loops of repeated audio clips, at an exact tempo that doesn’t change, it might be possible to do some nulling work to get parts out.
Let’s say a track started with a drum loop for four bars, and added a chord loop for the next four bars. By identifying the correct tempo, chopping out the first four bars and laying them alongside the second, and then polarity-inverting one of the tracks, it may be possible to get those chords.
Once you have the chord and the drum loop, you might be able to do some further digging and – often combined with the other techniques laid out in this guide – salvage some other elements.
Like all the techniques in this guide, this can be a very unreliable option, though. Compression stages on any bus or master treatment, as well as anything that may have messed with timing or phase of any of the tracks, make this an unworkable tactic for many tracks.
Groove Templates
Most DAWs these days have timestretching and warping functions, and out of these, a lot have created groove functions as well. Functions like Ableton Live’s Groove Pool, Logic’s Groove Track, and Tracktion Waveform’s Groove Doctor let you take the feel of one element in your track and apply its sense of ‘groove’ to another.
This is an obvious win for taking an audio part from one track and making other elements sound like they’re in-keeping with it. When you’ve grabbed a human-played beat from the original and want to fit in, say, a guitar loop from a sample pack, your DAW’s groove functions will help you to make them work together, in-time like a couple of Swiss clocks.
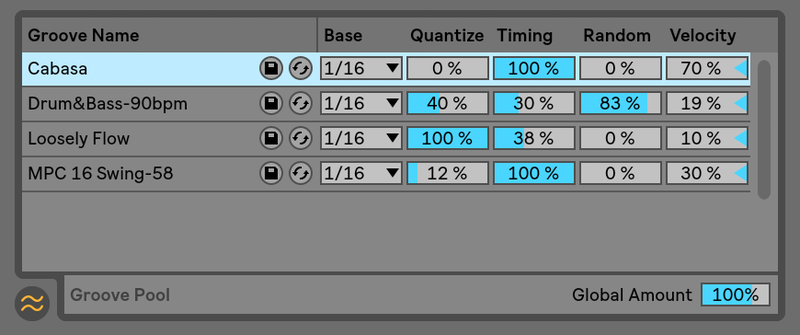
So what’s this special ‘feel’ that’s lurking under the sound of human-played instrumental tracks? Groove is all about the slight timing deviations for hits placed on specific beats in the bar. Perhaps every other 16th-note is slightly delayed, leading to a lazier, swung feel; or maybe the snares are hitting slightly quicker than they should each time, leading to a more urgent feel. Even with a consistent tempo, keeping each bar itself the same length, groove still exists because of the timing fluctuations of particular notes within.