The world of music production is complicated – it’s full of techniques, ways of working, attitudes and ideas, and nobody can ever store them all in mind at one time. New producers can find it hard to take in the advice coming from all corners of the internet about what they should and shouldn’t do or try, and others who have been producing for a while can easily get stuck.
In the constant search for inspiration that is the world of music production, sometimes you just need to dip in and out of a huge list of tips that can push you in the right direction… and wouldn’t you know, there’s one just a little further down the page!
1. Understand Inspiration
Writer’s block doesn’t exist – it’s an excuse to not get on with the job. If your usual methods aren’t getting you anywhere, search for a new way to get things done.
2. Layering Sounds
Knowing how to combine two sounds together is a key skill for any producer. Using the sample start points, tuning and envelope settings to get the best of two sounds working as one will take you far.
3. Free Software is Fine
There are loads of great plugins and there, and plenty of them are free. The difference in quality between a free and a paid plugin is usually in the marketing budget alone.
4. Seek out Frequencies with EQ Boosts
This is one of the classic pieces of advice – from when EQs didn’t have graphic displays attached. Grab a bell boost and scan the frequencies of a track or a full mix. Learn how the different frequencies sound, and start to identify harsh spikes that can be notched out.
5. Learn the Look
Use visual analyzer plugins to understand the frequency balance of commercial tracks. You’ll start to see a general profile for the whole spectrum, and how individual instruments are heard through the mix.
6. Collaborate with Others
The act of making music with someone else helps you to come up with something new, lets you discover new ways of working, and even access their fanbase. It’s a win-win-win.
7. The Bitter End
Finishing music is a separate skill. Like any skill, if you don’t practice doing it, you won’t become good at it. Even if a track’s not good enough to release, seeing it through to mixing and mastering will give you practice in decision making and refining, which you can use when you’re cooking something great.
8. Ear Fatigue is Real
Your hearing system can get tired like any other part of your body. Not only can your brain get used to ‘filling in the gaps’ of how something sounds, but the tiny muscles that regulate the sound power entering your inner ear need to rest as much as your mind does.
9. Learn How you Work
Discover how you make music in different brain states. Try making tunes when you’re sleepy, when you’ve just got up, when you’re tired and many more, and see how your own mind works in these situations. Everyone’s head is different – discover your own.
10. Loops are Fine, Presets are Fine
Using premade audio and synth presets is a totally fair thing to do. What matters is the intentionality you put behind their usage. Early hip-hop, for example, mixed entire ‘finished’ recordings and is considered an artform in itself.
11. All DAWs were Created Equal
However strong the marketing campaign, all DAWs do basically the same thing, and any can be used to make the world’s next summer smash. Workflow and the various stock plugins you have available are differences that can matter, but there’s nothing inherently ‘better’ about one DAW’s sound quality over another’s.
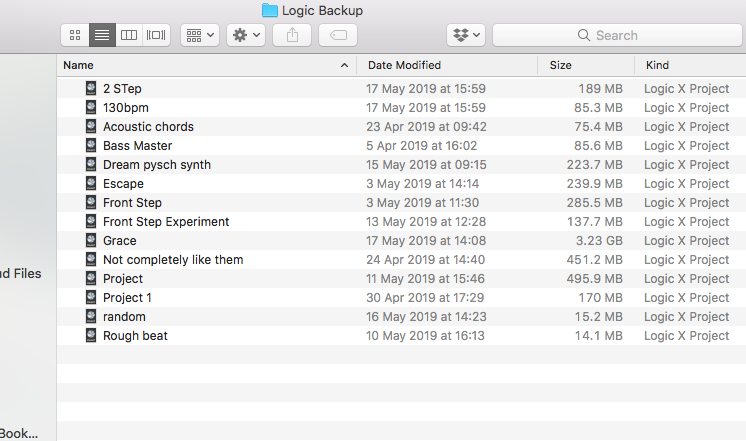
12. Name Tracks and Versions
Save your DAW projects using the X.Y system. When you make a minor change during a session, add 1 to the Y; when you make a significant leap forward, add 1 to the X. You’ll be able to look back and see how far you’ve come, and even restore specific versions.
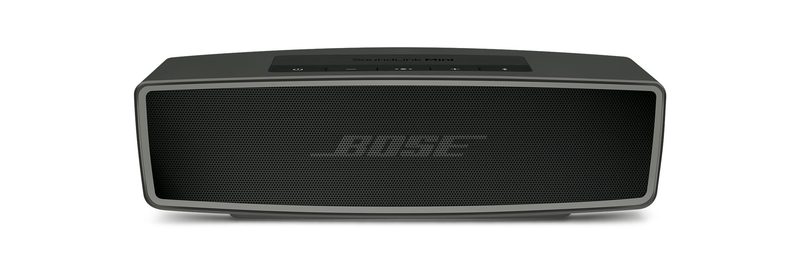
13. Reference Constantly
Compare how your work in progress or ‘finished’ mix sounds on different systems. Use different stereo systems, phone and bluetooth speakers, headphones, car stereos and anything else you can get your hands on.
While referencing, check your mix in mono to ensure no information has been lost. Next, check just the left and then just the right channels. Each should sound like a competent mix when standing on its own, with no elements lost.
14. Remake a Tune you Respect
You can discover a huge number of things about how a track was made by simply trying to recreate it, beat for beat, in a DAW from scratch. What oscillator sounds are at play? How do the kick and bass come together? Where does the sense of groove come from?
15. Don’t get stuck in the process
It’s possible to take music to the point where it’s an exact science… but that’s no good for your listeners. Being a technical nerd can be attractive, but no one’s going to be dancing because of your dynamic EQ settings.
16. Always Use a Limiter
No, this isn’t about ‘mixing into’ a limiter to give you a different perspective – it’s about saving your ears. If a plugin control slips or a feedback loop is created, you’ll be glad you added that safety limiter to your master bus… and even moreso if you added it to your DAW’s default project template to open every time you started work.
17. Commit then Mix
Once you’ve got a track written, try rendering all the channels to audio and starting the mixdown fresh. There’ll be no overload of tracks, no existing plugins loaded and processing audio, and you won’t be able to go back and make a change to the original tune unless you really need it.
18. A/B Settings and Bypass Effects
Spent hours tweaking the same sound? Compare different settings using a plugin’s A/B functions to quickly tell which works best, and make sure you bypass effects plugins to see if they really contributed anything in the final analysis.
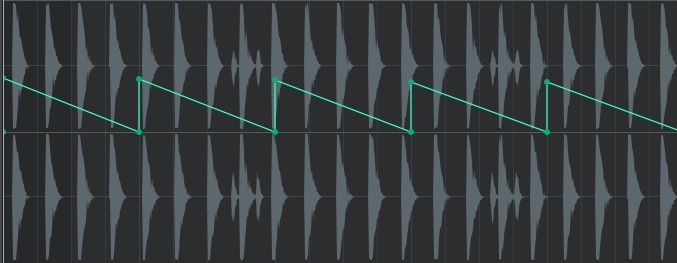
19. Sidechain Ghosting
Set up a duplicate kick channel that’s used only as the trigger to a sidechain input, and you can trigger reduction from an entirely separate source – very useful if you want a sidechain pumping effect to continue when the kick disappears at some stage in a tune.
20. Louder Sounds Better
This isn’t a command to make things louder – just make sure that you don’t confuse making something louder with making something sound better. Some plugins will open with a small gain boost right from the start, fooling you into thinking the sound is better just by loading them.
21. Learn Sound Design by Recreation
Take a synth and load a preset you like. Now, load a synth you’re trying to learn and try to recreate that patch – from the oscillators, through the filters and envelopes, to the effects and everything else – in the different instrument. You’ll learn a lot about what make the patch tick. For sound design tips in Ableton’s Sampler, give this article a go.
22. Discover how YOU Break out of 8-bar Loops
It’s the perennial problem of music production: you’ve made an eight-bar loop that sounds great, but spinning it out into a full track will break it. The only way to get out of the eight-bar rut is to learn the strategies that work for you.

23. Get a MIDI Keyboard
This isn’t essential, but the ability to play in notes, test out presets, and explore new musical ideas is hugely expanded when you have a few keys by your side. Grab the cheapest ‘board you can find, if necessary.
24. Learn How your DAW Works and stick with it
A DAW is a complicated bit of software with a massive feature list. Having a sensei-like knowledge for how yours works will stop you from wasting time when moments of productivity strike or a great idea reveals itself.
25. Have Separate Sound Design Sessions
This doesn’t work for everyone, but the idea of having specific times set aside for designing sounds, and only coming to the track-building stage later, means that you can keep tasks – and the mindsets needed to do those tasks well – completely separate.
26. OSFA EQ
There’s no such thing as one-size-fits-all EQ advice. Saying that, for example, a boost at 200Hz will make a bass guitar sound a certain way is foolish – the actual frequencies involved depend more on the actual notes being played, which, as you can imagine, tend to change.
27. Resonant High-Pass
Use a high-pass filter with a few dB of resonance set just below the fundamental note of a bass track to give a more solid low-end weight to it. This is a similar idea behind the Little Labs Voice of God hardware processor.
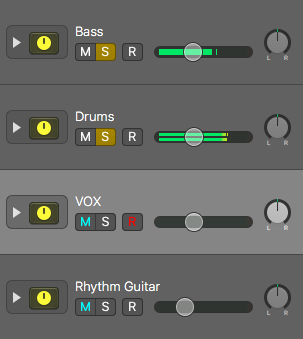
28. Colour-code and Tidy up your Session
Organise your DAW projects properly. That way, when you return to them, you can come back with real momentum, knowing where everything is, and being able to dive straight back in.
29. Work Backwards in the Patches List
Normally browse your synth patches from A to Z? So does everybody else. Keep things fresh and as unique as possible by demoing sounds from the bottom up, rather than from the top down.
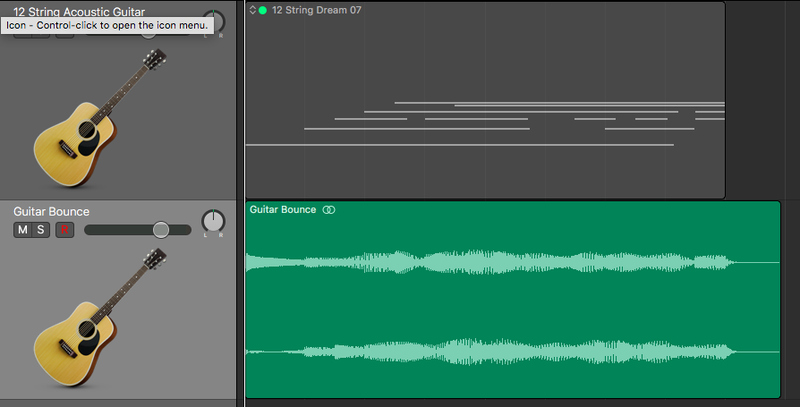
30. Render to Audio
Not only doesn’t bouncing a MIDI instrument part help you commit to audio, but the creative opportunities you get from slicing, retiming, sampling and stretching pure audio – even reverb returns, for example – can give you far more musical results.
31. Use Noise Effectively
This atonal sonic building block is a key part of the music-making process. Learn how it works in subtractive synthesis, in providing attack to drums and other hits, and how to build more interesting, complex sounds by adding effects to it.
32. Stock Plugins are Great
Your DAW’s own processors? They might not have quite as many features, but they’re usually just as good in terms of sound quality as a commercial plugin. Your DAW’s tools might not look quite as attractive, but they’re 95% just as good most of the time.
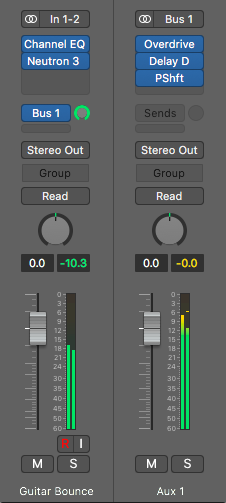
33. Use Effects on Return/Aux Channels
While Inserts are the quickest way to load an effect, using an Aux/Return channel has huge advantages: you can adjust the level of the channel, add plugins just to that effect in parallel, and filter its output to blend it with the original sound.
34. The Mod and the Macros
When you want to vary a preset synth patch, using the mod wheel and macro controls to do so – the sound designer has usually assigned these to parameters that work well when they’re automated or changed over time.
35. Filtering and EQ Meets Delay
In electronic circuits, basic filters are created by connecting a resistor and a capacitor in certain formulations. As a capacitor builds then releases charge, a filter effect is quite literally caused by tiny delays applied to the signal, which loses certain information (low or high). For this reason, there are phase changes to the audible parts of the signal around the cutoff. This is replicated in ‘analogue-style’ digital filters, but not in linear-phase filter/EQ models.
36. Re-Amping and Re-Recording
One way to bring a new depth and dimension to a sound is to play it through an amp and record the result, replacing the sound in your project. Just like re-amping a sound can give it a new vibe and character, playing it through old equipment, such as a cassette or VHS player, can bake in that lofi vibe like nothing else.
37. Production is Reduction
This is one key way to think about mix engineering: production is about taking away anything unnecessary. Adding more parts to something in an attempt to make things work together is far less likely to be a worthy strategy.
38. Automation is Crucial
Think about it. Automation is one huge advantage of a computer-based DAW over older methods of music production. If you’re after a modern sound, this is the way to get it.
39. Try out a New Instrument
It’s possible to be a veteran producer without having played a ‘real’ instrument in your life. But if you’ve ever messed with a number of new instruments, you might have noticed how your naive first attempts to create sounds can lead to the most interesting results. As you struggle to get a coherent sound out of the new tool placed in front of you, you’re at your most open-minded musically, with no preconceived ideas of how the instrument should be used. In this stage, you’re likely to come up with something remarkable.
40. Mono-ize the Low End
Bass and sub frequencies below 120Hz can cause real problems if they’re in stereo – mostly when recombined on any playback system that sums them to mono. Mix with this in mind and be sure to check if you’ve caused any low-end problems in your project.
41. Know When to Bin It
Just as in life sometimes, being able to tell when a project is a dead-end, and therefore a waste of time, is a very useful skill to have.
42. Get Professional Help
Mixing and mastering engineers – those who spend all day engaged in their own specific task – are likely far more likely to get a better result from your track, especially considering their fresh ears.
43. Parallel Channels aren’t Just for Compression
The idea of blending in an extremely processed signal with the original audio channel is common in parallel compression technique, but try it with more effects – distortion, delay, pitchshifting and more besides.
44. Beats in an Arpeggiator
These devices are designed to recycle held notes in a different pattern, so playing kick, snare and hi-hat or assorted percussion through one, and then messing with the settings, can be a great way to come up with something cool.
45. Auditioning Just the Bass
When you’re comparing the low end of your track to a commercial tune, try low-passing both at about 150Hz in order to hear only the bass end. This can give you a better idea of how the low-down elements are really interacting.
46. Compression Meets Distortion
Harsh, quick compression or limiting can act like distortion. Imagine a sine wave having its top and bottom peaks cut off – you’re quite literally pushing the wave through a system that can’t handle its full signal, and the sound is very similar to the result you’ll get from adding certain distortion settings.
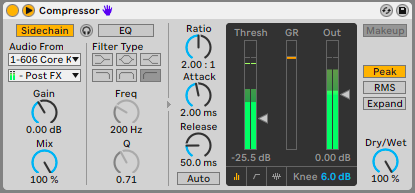
47.Kick and Bass Mixing
When trying to get a kick and a bass sound to work together, sidechain a compressor over the bass sound to be triggered by the kick’s signal is the best way to carve out space in one for the other.
48. Learn your DAW’s Rack System
Being able to gather instruments and effects into combinations that act as one can be vital. Not only can these racks be saved and recalled later – multiple single controls can be moved as one using macros, which are great for automating a single parameter that actually controls many changes throughout a track
49. Copy Your Heroes
Load a commercial track you respect into a DAW project, add three elements that complement it, and then take the original away. Go forward with your new elements only.
50. Depth is a Property
We don’t think about panning and level in the same way we think about depth, but we should. Understanding how to move sounds back and forward in a mix is as important as knowing how to move them left and right
51. Take Breaks and Return with Fresh Ears
You’ve likely had moments of returning to a track you liked, after some time, and wondering what you were thinking. You can get so engrossed in making a track that you start filtering out all the bad stuff – take breaks to keep your perspective fresh.
52. Sidechaining Pump vs Volume Automation
Volume automation lets you keep a pump in time without relying on a kick drum signal, whereas sidechaining provides an exact reaction to the sidechain signal, meaning you can change it to get a different response.
53. Pink Spectrum
The power of pink noise – energy at all frequencies reducing at 3dB/octave – is designed to be a good representation of the human hearing system, which responds using a very similar roll-off.
54. The T-Pain and Cher-style Auto-Tune Effect
…can be made using Auto-Tune or other pitch correctors. Set the Retune Speed to the quickest it can be, set the plugin to the key of the sung vocal, and then let it correct the sung vocal, snapping it perfectly as it drifts and misses perfect notes.
55. DIY Modulation
Flanging and chorusing effects are caused by duplicating a signal, delaying one copy, and modulating the delay time. It’s perfectly possible to create them using your own delay, set very slow.
56. Music Theory and when to Use It
‘Proper’ theory is a subject that tends to divide music producers. Whichever side you’re on, there are producers on both ends of the argument who make great music with the tools they have at their disposal.
57. Plugin Shortcuts
VST Plugins also work with folders, shortcuts and aliases in your OS’s file browser. You can set up folders for different types of plugins, or favourites, and curate your own custom collections.
58. The Shortcut to Learning Shortcuts
When you’re reaching for a parameter in your DAW using a menu or a right-click, see if the function has a keyboard shortcut alternative. If it does, don’t click it – use the shortcut instead and you’ll be more likely to remember it later.
59. CPU vs RAM
In computer-based music production, your CPU is taken up by audio calculations (synths, effects, etc) while RAM is taken up by loading samples and files (complicated multisampled instruments, lots of recorded audio, etc). Know exactly what you’re going to need, and you can prepare a system without the limitations you don’t want.
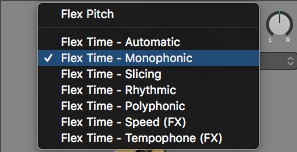
60. Timestretch Flavours
There are a few timestretching algorithms to choose form when warping beats, textures and other sources. Try out all of them to see if different ones work better on your source material.
61. Pre-fade Sends
These controls in your DAW’s mixer are used so that the send level has nothing to do with where you set the fader. Use them when you don’t want to hear a channel in the main output (or want to change its level) but you do want its signal to be used consistently in the send – a ghost sidechain trigger, for example.
62. DAW Templates
Have you set up custom templates or a default loading project in your DAW? This can save you frustration when all you want is to get into the mood of making music. Set up the plugins, the channels and everything else you rely on, including that master limiter on your output chain for your own safety.
63. Pitchshifting vs Frequency Shifting
Pitchshifter effects multiply the input signal by a certain amount, retaining the harmonic relationships between everything. Frequency shifters, meanwhile, add and subtract frequency values from audio signals, meaning everything shifts in a non-harmonic way. Frequency shifters can be especially interesting on atonal signals like drums.
64. Reverb Early vs Late Reflections
The early and later reflections of a reverb have different roles in conveying sound information. Early reflections give a listener information about the sound and its position relative to the listener; Late Reflections convey more information about the size and the type of simulated environment.
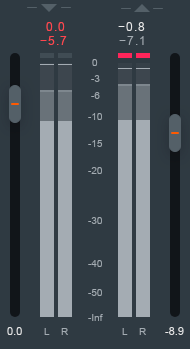
65. Peak vs RMS Metering
On your meters, the peak level tells you the highest level your audio has reached recently, while the RMS reading tells you the average level of the signal – its perceived power. The target for the difference between the two in modern music is often 12dB… but only after mastering.
66. Your Listeners Don’t Care…
…what multiband compression settings you used, how many voices a synth patch has, or how much oversampling you’re running in your distortion.
67. AD and ASR envelopes
… can be made out of standard ADSR types, first by reducing Sustain to 0 (to make AD), and then by increase Sustain to Maximum (to make the Decay stage meaningless)

68. Slightly Out of Time
Unsync delay times and move them very slightly off the grid to a mistimed delay that still gives space for the other parts that hit on the bars.
69. Compression isn’t for Everything
It’s very easy to reach for a compressor to see if a sound can be made better.
70. Touch it
When mixing, get a feel for the lowest bass end – literally – by touching your hand to the loudspeaker cone to get another dimension on what’s going on.
71. Listen at Different Volumes
Mixing and mastering with your monitors or headphones turned down doesn’t just prevent your ears getting tired; it’s actually a great way to understand the balance of frequencies at play and spot any harsh areas that stick out above the (quiet) noise.
72. Plugin Consumerism
It’s tempting to buy new plugins in order to open up new possibilities… but then again, why spend the money and the time on getting up and running with them? You shouldn’t be buying new tools to open up new creative opportunities – you are the creator.
73. Drum Atonality
Remember, drum sounds are basically atonal, meaning that they don’t have a defined pitch – at least not an especially strong one. This makes them very suited to all sorts of processsing that won’t always work on tonal, melodic material. Frequency shifting, ringing modulation and layering with noise are great calls with drums.
74. Don’t Just Solo One Sound
Mixing is contextual. Soloing a single sound to hear it properly can be useful to a point, but if you can learn to work on a sound while the rest of your mixer channels are playing, your process and results will benefit massively.
75. Gate Sidechaining
Try using a sidechained gate in expander mode to duck one element when another is playing. Like sidechain compression, this can remove sounds that aren’t needed at a certain point, but the gate’s controls can be friendlier for getting a smooth, consistent volume reduction and reintroduction.
76. Shelf Lift
When boosting an EQ’s high or low shelf filters, try adding another EQ band to slightly cut the frequencies just before the shelf starts. This can bring extra focus to the boosted region.
77. Know Your Tools
It’s better to make tracks using only one synth that you know incredibly well than to use six you only have a cursory knowledge of.
78. Repetition with Changes
Electronic music production is basically a balance between repetition and change. Combining the two in smart ways is key, keeping a consistent groove with some elements adding interesting variations on themselves.
79. Absorb to Record
No matter how good your microphone, a home recording setup’s weakest link is usually the room you’re recording in – specifically, the reflections of your sound off the walls, and particularly those walls that are close to the microphone. Dampen the room sound by placing absorbent materials like pillows, and any other heavy fabric objects, against the walls to stop those direct reflections as much as possible.
80. Serial Compression
Dynamics sounds from acoustics instruments – vocals, piano and guitars are prime examples – can be solved by two-stage compression. To better control these sounds, set one compressor (or limiter) up with fast attack and release times and high Threshold and Ratio, in order to clip the highest peaks off; and then set up a second to add character with slower, gentler compression.
81. De-Harsh
De-essers – especially those that can work on a selected band of frequencies – can be very good at remove other harsh spikes from sounds like cymbals and high synth parts.
82. Haas Panning
Panning sounds is done in a DAW by changing the level of the left and right channels relative to each other, but there’s another way: by delaying the left or right channel slightly, you can create a more psychoacoustic panning experience without actually changing any levels. You’ll have to check your sound in mono when doing this, though, as these delays can lead to phase cancellation.
83. Retiming the Snare
You can give a track a slightly more laid-back feel by dragging the snare very slightly off-the-grid later in time. Going the other way, slightly earlier, can give a track a more frantic feel.
84. Back up
The music on your computer is sacred, and accidents do happen. Back up your computer regularly or use an automatic system to make sure you don’t lose everything you’ve been working on.
85. Record MIDI in Half Time
If you’re not the best MIDI performer, try halving your project’s tempo while you record and play a part in slower, and then cranking it back up to regular speed when you’re done.
86. Tuning Drums
An often overlooked part of working with drums is their tuning. While drums are atonal, they usually still have a fundamental frequency. If the fundamentals of your toms fit with your track’s key, your drums will tend to sound better. Have at the Tune control on your sampler/drum machine.
87. Distortion is Additive
When adding a distortion effect to an audio source, the result is usually added harmonics above the fundamental frequency, meaning that distortion placed on one sound will actually show up higher in the frequency spectrum. Not every single distortion type acts exactly like this, but most generic and well-known flavours do.
89. Ghost Notes
Learning how to add ghost notes (aka grace notes) to drum parts is a key skill for a getting a groove going. Use very low-velocity notes placed when a drummer’s left hand would strike in a Right-left-right-left pattern of eighth-notes – for more, check out this tutorial.
90. Pitchbend Wheel Tricks
If your synth can use the pitchbend wheel as a modulation source, try hooking it up to another parameter, such as filter frequency or distortion amount, and making more things happen with the pitch is changed.
91. Compression isn’t a Numbers Game
Don’t look to bring a specific amount of gain reduction into a sound. Forget what your eyes say – use your ears and reference the compression settings with the whole mix playing too.
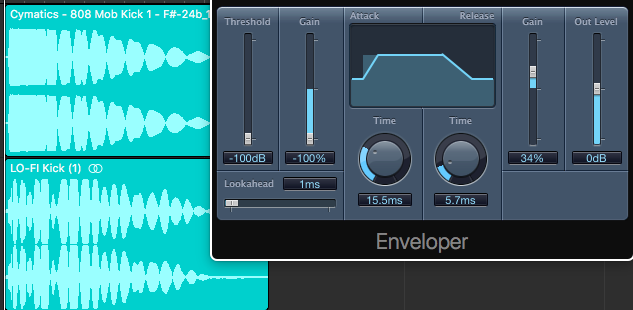
92. Blending Kicks
The three phases of a kick drum include its fast transient ‘attack’ stage, its sustaining ‘body’ stage and its decaying ‘tail’. It’s entirely possible to combine multiple kick samples by slicing the stage out of each one and crossfading the three wanted stages into each other in order to create one master hybrid kick.
93. Linear Drum Parts
Linear drumming is a technique in which no two elements of the kit are hit at the same time. As it happens, this can be incredibly convenient for mixing – you don’t have to separate drums in frequencies if they never sound out at the same time. If you can program interesting rhythms that still groove in this way, then you’ll have a nice time at the mixing stage.
94. Bass Sound Smith
When you’re creating a bassline and need a sound for it, you reach for a synth, right? For an alternative take an a bass sound, try pitching down various types of material such as vocal snippets, high string plucks or similar – the aim is to get personality and keep the tone for the low-down weight.
95. Pitchshift + Delay
If your DAW lets you send an aux/return channel back into itself (Ableton Live is a good example), you can set up networks of delay and pitchshift effects that feed back into each other. Using a delay with a single echo, the result is a cascading echo that pitches down (or up, or both) with every single repeat.
96. Take the Edge off Backing Vocals
Backing singers’ consonant sounds (“T”, “sh”, “f” etc), can confuse those within the main vocal line. Try slicing them out or reducing them in volume if they clash too much, or if recording a backing singer, try a version using just vowel sounds.
97. Smaller Speakers
Make sure you’re mixing ready for small speaker playback systems. As well as referencing using these playback types, ensure that your bass is audible – saturation and distortion of just the low-end frequencies can help this particularly well.
98. Easy Drum Auditioning
Load up all your kicks, snares and other drum sounds in sampler instruments so you can quickly and easily audition them to find the perfect sound for your track.
99. The Limits of Humanity
Beware humanizing your drum patterns too heavily – two of the most important things that real drummers are skilled at regulating are their timing and the strength of each hit. Real humanity is brought into MIDI by adding just a few ticks of timing variation and sticking to single digits of velocity variation.
100. Voco Loco
A high-resolution vocoder isn’t just for vocals – you can use it to regulate any instrument’s spectrum and imprint a new distribution of frequency strengths on it using another source as a modulator input.
101. Beware Volume Changes
All processes done to your audio have the potential to change its volume. Compression is an obvious example, reducing level and then boosting it back up again, but many other processed can do the same thing. Stay aware that your effects might be having an impact on the level of a sound, and this could interact with other parts of a project.